Exercises with the Shape Builder Tool in Adobe Illustrator
In this lesson, we continue to consolidate our knowledge of the Adobe Illustrator tools we have covered. We have already created simple icons using primitives and strokes in Adobe Illustrator, and now we will create complex shapes using the Shape Builder Tool.
In the materials for this article, you will find a small palette that you can use in your work.
So, let's start the exercises with the Shape Builder Tool.
Create a circle 150 by 150 pixels. Remove the fill color, leaving only the stroke color. Use the keyboard shortcut Ctrl-C, Ctrl-F to copy this circle to the front.
Hold down Shift Alt to maintain the object's proportions and reduce it from all sides to the center of the object.
Reduce it to about 115 pixels. This point is not essential, round values are just easier to remember.
After you have reduced the circle, hold down the Shift key to make it move strictly in a straight line and drag the circle until it meets the right side of the outer circle.
After joining the circles, drag the same circle to the left while holding down the Shift key until it joins the other side of the outer circle. But this time, also connect the Alt key so that this circle is copied. Once joined, select all the created elements.
This can be done with a rectangular lasso, or if you currently have no other objects on the artboard and in the workspace, then you can select the desired objects using the Ctrl-A keyboard shortcut.
Select all the objects and use the Shift-M keyboard shortcut to select the Shape Builder Tool.
From the created intersections, make new objects like these slides (shown in red):
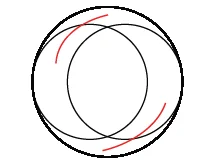
After that, hold down the Alt key and go to the object deletion mode. The plus sign next to the cursor will change to minus and you can delete the object at the intersection. To do this, simply click on it. As a result, you should get elements like these (if you move them apart):
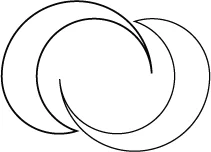
Now open the palette that is attached to the materials for this article and copy these colors to your artboard. First, select the object on the left. Press the I key to select the eyedropper or find this tool in the work panel on the left.
After that, point the eyedropper to the gradient and click on it once with the left mouse button. This gradient will be applied to your object.
Next, go to the gradient settings and change its angle. If you click on the sample, you will see that it has a specific angle of 90 degrees.
Go to the object and enter the gradient angle from the sample. Notice how the gradient direction immediately changes.
Repeat the same action with the second object, only there the gradient angle will be -90 degrees. Your drawing is ready.

Create the next drawing in the same way as last time, starting with a circle 150 by 150 pixels.
Use the keyboard shortcut Ctrl-C, Ctrl-F to copy it to the front and reduce it to about 90 pixels. This is not important. After that, copy the smaller circle to the side.
Next, pull the right side of this circle to the junction with the smaller circle, and stretch its upper and lower parts a little in an arbitrary way.
It is very important that the stretch you made is the same at the bottom and top. Therefore, select these objects and click on the smaller circle. As soon as it lights up with a bold blue outline, in the Transform palette or in the dynamic panel, apply the vertical align center command.
When the created ellipse is aligned with the circle, copy it to the other side until it meets the larger circle. After that, select all the objects and choose Shape Builder Tool and make a couple of slides:

Since many elements were involved in creating the design, you should haveand remain trimmings. Select the objects one by one. Press Ctrl-X to cut them. Select the trimmings:
Delete them.
After that, return the cut objects to their original place using the Ctrl Shift-V keyboard shortcut. Select the eyedropper and copy the colors from the palette. Don't forget to write the correct gradient angles (-90 and 90 degrees).

Draw the next object in Adobe Illustrator.
Create another circle measuring 150 by 150 pixels. Copy it to any of the sides until their centers intersect the sides.
Copy one of the circles down again. After that, select the upper circles and group them with the Ctrl-G keyboard shortcut or choose the Group command from the Object menu.
Select all the objects. After that, click once on the group of circles. Since you grouped them, they will both be highlighted with a blue outline. This is what you need.
In the Transform palette or in the dynamic panel, execute the horizontal align center command. Raise the lower circle up so that its center lies on the lower intersection point of the two upper circles, so that the common intersection of these circles creates a regular reuleaux triangle.
And your last circle will go directly to the center of the reuleaux triangle.
Select the created structure, choose Shape Builder Tool and make several slides with the mouse:

After that, select the eyedropper, copy the gradients and set the angles.

The next drawing will be a little more complicated.
Draw a circle of any size. Select the Direct Selection Tool. Grab the upper anchor point of the circle and pull it up a little. Hold down the Shift C key combination or select the Anchor Point Tool in the toolbar on the left. It is located in the same place as the Pen Tool. Just click on it with the left mouse button and hold until the extended tool palette appears.
Then just click once on the extended upper anchor point. Now you need to work a little with the plasticity of the sides of the created shape. These sides must be edited identically. Therefore, you can cheat a little. To make it easier for you. Select the scissors tool and simply cut off one of the sides. Delete it.
Select the remaining side. Select the Direct Selection Tool. Click on the anchor point to display the manipulator. Working with this manipulator, you can radically change the plasticity of your shape.
Click on the upper end of the manipulator. With the Shift key pressed, pull the manipulator up a little to change the plasticity of the shape.
The Shift key is needed for vertical movement of the manipulator. Notice how flexible your curve has become. Copy it also with the Shift key pressed strictly horizontally.
Then right-click, the Transform command Reflect. Check the preview box to see the changes in real time, and then select Reflect vertically.
After that, join your curves. Select them and hold down the Ctrl J key combination. This is necessary to combine individual contours into a single contour. Or you can go to Object, select Path, Join command.
Remember the hotkeys so that you don’t have to go into the menu every time to perform any of the commands. It’s inconvenient and too long.
After that, use the keyboard shortcut Ctrl C, Ctrl F to copy the object to the front, reduce it and move it up a little. All sizes are arbitrary. Next, create a circle and place it as shown in the picture.
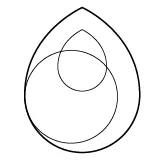
Try to do it approximately the same way. The only important condition is the docking or intersection of the circle with the object in the area on the left.
If you doubt that you have docked the objects, you can go to the Outline mode, the keys Ctrl Y and check. If you still doubt, then without leaving this mode, just make a small intersection.
Next, cut off the outer contour of the object and the inner one with the scissors tool in two places, it does not matter where you will do this.
Delete the cut out parts of the contour. Select the pen tool and close the created cuts with segments.


Take the Direct Selection Tool and click on the anchor point marked in red in the picture. A rounding handle will appear. Click on it and immediately drag it, rounding the corner. Click on the second anchor point in the same way and round the corner.
Select all objects and use Shape Builder Tool to make a new object.

After that, select the eyedropper and apply gradients from the sample.

Now draw the same element from the lesson "Analysis of the Shaper tool and Shape Builder Tool in Adobe Illustrator"
Create a circle. Copy it to the front and reduce it. Let the size of the outer circle be 200 by 200 pixels. The size of the inner one is 150 by 150.
Select the circles and group them. Then proceed as with the reuleaux triangle. Copy this group from the circle to the side so that the sides of the large circles intersect their centers.
Copy one group from the circle down. Group the top circle group together and align them horizontally to the center.
Raise the group of lower circles until their centers intersect with the lower intersection of the upper elements at this point:
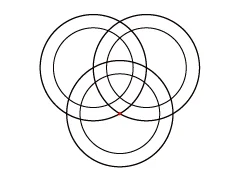
After that, select all the objects and use the Shade Builder Tool to switch to delete mode and delete these objects:

If Adobe Illustrator groups your objects after processing, then ungroup them using the keyboard shortcut Ctrl-Shift-G.
After that, select the created elements and press the keyboard shortcut Ctrl-X to cut them out.
Delete the cutouts and press the keyboard shortcut Ctrl-Shift-V to return the objects to their original place.
This way you will get an "infinite pretzel" somewhat reminiscent of the Penrose triangle.
Use the palette to give your drawing a more finished look.

I think you are convinced that having some basic knowledge of the tools of Adobe Illustrator, you can create quite nice graphics. Sometimes it is enough to just play a little with the intersection of primitives.
