Stroke and Appearance Palette. Creating Simple Icons in Adobe Illustrator
Let's take a closer look at the stroke and the Appearance palette, and at the end we'll create some icons based on what we've learned.
Let's start with the basics. By default, when you create an object in Adobe Illustrator, its fill color will be white and its stroke color will be black. The default stroke thickness is measured in points.
Try changing the outline thickness. The outline color changes if you double-click on the black square (the color palette will open).
You can also change the outline color in the Color palette. The keyboard shortcut Shift X can swap the stroke and fill colors. You can also swap the stroke and fill by clicking on the arrow.
To open the menu for working with the stroke, click on the command Stroke. In the column Weight you can change the thickness of the outline, as well as work with more subtle settings.
Align Stroke - this is the type of outline: standard stroke, inner stroke and outer stroke.
Corner - to change the type of contour corners: sharp corners, rounded and beveled.
The corners of the inner stroke type cannot be either beveled or rounded.
Cap - relevant for the ends of objects with a stroke: cut (the stroke will end on the anchor point line), rounded (the usual rounded end) and protruding (the stroke will go slightly beyond the segment anchor point).
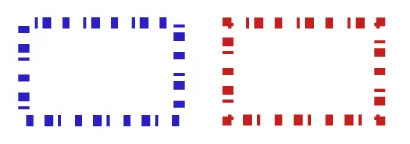
Dashed Line. To activate the dotted line, check the box.
Dash is the dash itself (changes the width of the dash), gap is the space between dashes (changes the width of the gap).
Note that there are only six cells, this means that we can also edit the width of every second and third dash, as well as the width of every second and third space.
Let's try to set a value in each cell. Such a wide editing capability will allow you to create completely unique dashed lines.

We can also choose the type of closing of the dashed lines at the corners of objects.
In the first case, the corners will be closed chaotically. In the second, there will always be dashes at all corners.
To make the side dashes identical to the corner dashes, you need to increase the stroke width to the size of the stroke width.

Align - creates arrows at the ends of the dashes.
Profile - changes the stroke profile, but it is more convenient to do this not here, but in the dynamic panel.
In the dynamic panel, we can change the outline type. In the adjacent menu - apply different brushes to the stroke.
By default, the choice of brushes is very small, but on the Internet you can find many free options, and you can also create brushes yourself.
It is important to know that the stroke can be dynamic. To work with a dynamic stroke, you need the Width Tool. You can find it in the toolbar on the left or use the keyboard shortcut Shift-W.
Let's imagine that we have a certain segment, and our task is to expand it on the left side and narrow it on the right.
Select the Width Tool tool, move the cursor to the cut of our segment, hold down the left mouse button at any point of the cut and drag the cursor up, thus expanding the width of the stroke.
Release the left mouse button and move the cursor now to the right side of the segment. Hold down the cursor and drag in the opposite direction, narrowing the segment.
You can change the outline thickness not only at the ends of the segment, but also in any other place. For example, hover over a certain part of the segment and drag the mouse in several places.

We can also work with the outline thickness with closed shapes, such as a circle.
Now let's look at the Appearance palette in Adobe Illustrator, but first we need to add it to the sidebar.
Open the Window tab and look for it there. Hold down the palette header with the left mouse button and move it to the side panel.
Let's say we have a circle with a stroke.
Let's open the Appearance palette. In it, we can also change the outline thickness, its color, fill color, and change the opacity.
You can choose colors from the suggested list, and also add your own colors to this palette. To do this, click on the New Swatch command and create a new color.
To find more swatches, go to the Swatch Libraries menu. Here you can also save your swatches with the Save Swatches command.
This way, when you create a completely new document, you can return to this menu, click Other Library and select the template that you saved.
The open list of saved template colors will also include those that you created and saved yourself.
Let's return to the design functions. You can create, for example, a second stroke. Moreover, it can be of a completely different type. You can make it internal or external. You can, for example, move the second stroke behind the object and increase its thickness, thus creating the effect of a double stroke.
You can create an unlimited number of new strokes.
What can you do with the second outline?
You can go to the effect, select Gaussian Blur and apply it to the second stroke, thus creating a soft blur effect.

Various effects are located in the Effect tab, and also if you click theAdd New Effect command in the Appearance palette.
Let's move on to practice and consolidate our knowledge of creating objects and creating strokes in Adobe Illustrator.
Create a number of simple icons using the tools we've learned.

First, create a new artboard. Let the units of measurement be pixels, the resolution 1920 by 1080, the color model CMYK, then click OK.
Create a circle 200 by 200 pixels. By default, the circle fill color is white, and the circle stroke color is black. Remove the fill color by clicking on the red slash. Double-clicking on the current stroke color will open the palette and create any other color you like.
Next, increase the outline thickness to 20 points in the dynamic panel. Outline type - center. Select the Polygon tool and left-click once on the artboard. Set the number of sides to 3, and the radius to any value.
Now, visually reduce the triangle, rotate it exactly 45 degrees twice.
To make an even cutoff at 45 degrees, hold down the Shift key.
Use the selection tool to move it inside the circle, go to the Transform palette and round the corners, by about 3 pixels, but this is up to you. After that, work with the size and proportions of the object and its position.
Make sure that you have the stroke scaling function disabled, it is not needed now. To do this, go to the settings with the keyboard shortcut Ctrl-K and uncheck it, if you have it checked.
The first Play button icon is ready.
Let's create the second one - a minimalist mobile phone icon.
Hold down the M key to select the Rectangle tool. Using the quick guides, make it the same height as the Play icon, and the width at your discretion.
Let the outline thickness and color be the same.
In the Transform palette or in the dynamic panel, set the rounding for the corners, for example 20 pixels.
Next, activate the Segment tool and drag it along the bottom of your drawing while holding down the Shift key (in order to draw strictly horizontally).
The outline thickness is the same.
Move closer to your icon and draw another circle.
Next, use the Shift-X key combination to swap the stroke and fill.
Select the circle, the segment, remove the Shift key and click on the segment again. When it lights up with a bold blue outline, align it horizontally to the center, you can do this in the palette Transform or in the dynamic panel.
Drag the circle up, holding down the Shift button so that it moves strictly vertically.
Now let's draw a mail icon.
To do this, create a rectangle. From one corner of the rectangle, drag a segment to the center of the object. After that, drag the same segment from the upper right anchor point of the object also to its center.
Select both of these segments and go to Object-Path-Command-Join or press Ctrl-J to combine these segments into a single path.
Select the rounded stroke type for this path. Then round the corners of the rectangle in the dynamic panel or in the transform palette, let it be 25 pixels.
Lower the path down a little so that it does not go beyond the edges of the rectangle. After that, work with the sizes and proportions of the entire object.
The next icon is the geolocation symbol.
Create a perfect square and round all its corners to the limit, in this situation it will be easier to do it manually.
Hover the cursor over the manipulator in the center of the resulting circle. A part of this circle will start to be highlighted with a blue outline.
Click the manipulator once, grab it with the left mouse button and drag it to the side. This way you will stretch one of the corners, making it sharp again.
Rotate your object with a 45-degree misalignment.
Select the Ellipse Tool, hold down the Alt key to get a crosshair.
In the Ellipse Tool, move the cursor to the center, hold down the Shift key and create a new circle from the center.
Edit its proportions and dimensions as you wish.
Remember that objects can be grouped using the Ctrl G key combination, this will allow you to select one object from the group and select all objects in the group at once and move the entire group.
Next icon.
Create a circle and draw a segment in the middle.
To deselect an object, simply switch to the Selection Tool and click on the artboard. You can also use the Ctrl Shift A keyboard shortcut or go to the Select menu and click Deselect.
Using the Alt key, as last time, create another circle from the center of the object, do not forget to hold down the Shift key.
Hold down the Alt key again and narrow the circle on the sides. After that, select the top anchor point one by one, then the bottom one, and drag them to the junction with the outline of the main circle.
Now create an avatar icon, it will be very simple.
Create two circles, one smaller, the other larger. Align them using the smart guides or the Align palette and join them.
After that, remember that you have such a wonderful tool as scissors, select them and cut the large circle right in the middle by clicking on its side anchor points. Delete the lower part of the circle, and close the upper part with the pen tool, drawing a segment.
After that, select the resulting semicircle, go to the Direct Selection Tool, immediately after which you will have manipulators for rounding.
Round the corners of the object at your discretion and the icon is ready. The rest of the edits are at your discretion, you can change the thickness of the strokes, sizes and proportions.
In the next lesson, we will create complex shapes with the Shape Builder Tool.
