
Understanding the Shaper tool and Shape Builder Tool in Adobe Illustrator
Let's start with a quick explanation of what a smart guide or smart guide is. These are the pink lines that constantly appear on the screen. They are called smart guides. By default, they work in Adobe Illustrator from the very beginning. These guides help you easily position objects relative to each other and relative to the artboard.
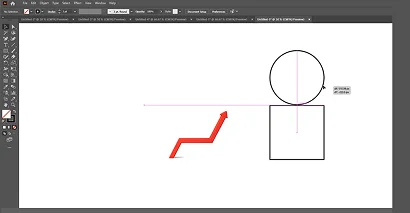
These guides are our indispensable assistant and should be turned on almost always.
To disable them, go to the View tab and uncheck the Smart Guides box or press the Ctrl-U key combination, you can turn them back on by returning the check mark or pressing the same key combination.
If you suddenly don't like the color of the quick guides, you can go to the settings menu (key combination Ctrl-K).
Then go to Smart Guides and choose a different color.
You also need to go to the View tab and uncheck the Snap to Pixel command, if you have it there.
Snap to Pixel – snaps the object to pixels. The checkbox must be unchecked for clear and correct positioning of objects in space and relative to each other. Snap to Pixel sometimes interferes with this.
Shaper tool and Shape Builder Tool in Adobe Illustrator
Let's start with the simplest thing - Shaper Tool. Let's find it in the evil toolbar.
What does the Shaper Tool do?
With it, you can draw any shape by hand. Shaper Tool, in turn, if it can, will recognize it and display it in a readable and understandable form.
Try drawing an ellipse, rectangle and polygon.
You can also use the Shaper Tool to draw simple segments.
To delete the created shapes, just cross them out with a careless stroke.

You can remove the outline of objects or change its color. The same with the fill color. The most interesting thing this tool can offer starts when the objects intersect.
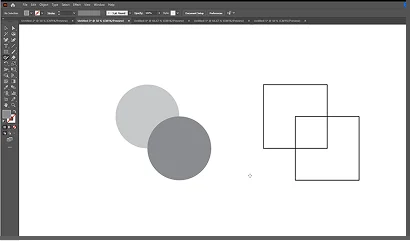
Draw several intersecting objects.
Let's use a casual stroke to delete the lower of the intersecting objects on the first pair of shapes.
What do we see?
Part of it remains as if enclosed in the upper object. If you select the resulting object, go to Object, select the Expand command, then in the same menu check the Object box, the rest is optional, and click OK, then these objects will be separated. Beforehand, only after the Expand command, you will also need to execute the Object Ungroup command in this particular case, or hold down the Ctrl-Shift-G key combination.
First, we created an intersection of objects, then edited this intersection, deleting part of the object. In this way, we created a design, that is, after deleting the object, Adobe Illustrator stopped perceiving these graphic elements as separate objects, and began to perceive them as a single design, as a single graphic composition as an effect.
With the Expand command, we disassembled this design, that is, removed this effect, so that Adobe Illustrator again began to perceive these elements as separate objects, and in the end we simply ungrouped them in order to separate them from each other.
You can also try the intersection of objects without a fill, but with a stroke.
Instead of deleting any of the objects, let's combine our objects into one. To do this, you need to delete the intersection.
Next, we need to analyze the design again. To better understand what is happening and what design is in this particular case, go to Outline mode.
Adobe Illustrator still shows us two full-fledged contours, two skeletons that we are working with. However, if you exit Outline mode, you will see one object.
Run the command Expand. Visually, it seems like nothing has changed, but if you switch to Outline mode, you will see that you already have one solid skeleton, that is, one object, but no design.
In fact, although this tool looks useful, it is of very little practical use.
A truly fundamental and very useful tool that you should definitely learn to use is the Shape Builder Tool.
To understand how this tool works, you need to create several shapes and create them so that they intersect each other.
Before you start using the Shape Builder Tool, you need to select a group of objects that you are going to work with.
Select the Shape Builder Tool or hold down the Shift M keyboard shortcut.
Note how the cursor changes. If you see a "plus" next to it, this means that you are in the mode of creating new shapes. If you hover over your objects, they will be highlighted as follows.
So, if you click on the top one from this entire group of objects, you will get the following result - the top object will be cut off along the intersection contour, the bottom object will remain unchanged, since you simply did not touch it with any actions. And you will also have a new object, as a result of the intersection of the shapes.
Now roll back and click on the bottom of the object.
The element you click on will be cut off along the intersection contour, the shape will remain unchanged and the element in the middle will appear again.
Roll back again and now click on the middle element and look at the result. You will have three objects formed.
This happens because the middle element you clicked on was the result of the intersection of two objects at once, that is, by clicking on it you affected both objects. After that, they were activated and cut along the intersection lines.
You can also click on all three objects at once, the result will be exactly the same.
Shape Builder Tool sees all the intersections of shapes, and allows you to create new shapes based on these intersections.
This method of creating shapes based on their intersections is called the conjugation method.
Let's move on to the second pair of shapes. There are two shapes and an intersection that draws a third shape for us.
It's exactly the same as in the previous case. Select this pair, but this time connect the Alt key to your work.
Up until this point, there was a plus sign next to your cursor, but now it has changed to a minus sign.
In this mode, you can also create figures, but by deleting.
How does it work?
Let's say you really liked the figure in the middle. You could, like last time, click on the intersecting elements and get three figures at once, and then delete the extra ones. But you can do it differently.
Select the shapes, choose the Shape Builder Tool, hold down the Alt key and click on the elements you don't need. This way, if you only needed the shape in the middle, you'll get just that one.
Another special case. You've combined two or more shapes, but this time you don't see any interesting intersections between them, and you'd like to make one shape out of all of them.
Pre-select all of the elements in the composition, choose the Shape Builder Tool, and don't need the Alt key this time. To combine all the elements, simply make a slide through all the intersections with the cursor.
The new shape is ready.
Let's now assume that you have an object and you want to cut it in half. In this case, you can draw a rectangle next to it, select all the objects, select the Shape Builder Tool, hold down Alt and make a large slide with the mouse cursor.
You can also use the segment tool. Draw a segment, and then do the same. Use slides to remove the ends of the segment, and then use a slide or a left-click to remove the extra object.
Please note that you will have a cut left after using the segment, do not forget to delete it.
Requiredo make sure that your segment exactly intersects the object, otherwise if it falls a little short of the intersection with the outline of the figure, it will not be highlighted. The highlight will follow the outline of the large object, and your planned small object will not separate.
In order to see such nuances, use the Outline mod, go to View, and click the Outline command, or use the Ctrl-Y keyboard shortcut, in this mod you will see the skeletons of all your objects.
If you did not stretch the segment to the junction with the outline, just without exiting this mod, grab the extreme support point of the segment with the Selection Tool, and pull it to the junction with the outline.
After you do this, repeat the operation, and everything will work out.
In this case, before separating the small element, you will need to ungroup the objects with the keyboard shortcut Ctrl-Shift-G. And also in a similar situation, if you are too lazy to look for places where there is no docking, you can take the same tool Selection Tool and extend these segments so that they extend beyond the object and intersect with each other with a margin.
If you do exactly this, then be prepared for the fact that in the end you will have trimmings that you will need to delete later. This is a small problem, actually.
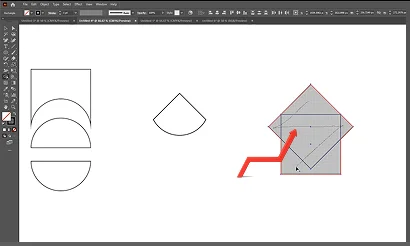
And finally, let's look at another situation. You have the same two forms. You need to create a new element not separating them as last time. You need to create a completely new shape from the intersection. But at the same time, you want the large object not to be deformed, but to remain unchanged.
You should not separate them and cut the small object from the large one. And you need to do this in such a way that the outline of the main drawing is not damaged.
Pre-select the large object with the keyboard shortcut Ctrl-C, Ctrl-F, copy it to the front. You can also do this through the menu Edit-Copy, Edit-Paste in Front.
Copying an object to the front means copying it over the copied object.
After that, you need to add two segments to the selected copy. To do this, hold down the Shift key, click first on one segment, and then on the second.
After you select all the objects, select the Shape Builder Tool, click on one of them, press the Ctrl-Shift-G key combination to ungroup and delete the excess.
As a result, you will get a new shape and save the old one without damaging it in any way.
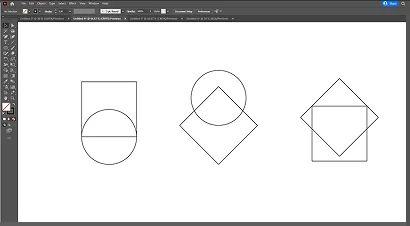
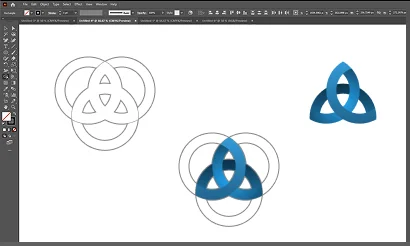
Now try to create such figures using these tools in Adobe Illustrator:
In the next article we will analyze the Pathfinder palette in Adobe Illustrator.
Pathfinder is one of the whales of Adobe Illustrator and we will analyze the palette for transformations and alignment of objects.
Осилил, с большим трудом, но осилил