Auto Layout in Figma
Auto Layout in Figma is a frame that has certain rules within it, and these rules mostly concern the distances within it.
How to make Auto Layout in Figma?
- Method: Create a frame and click "+" on the right in the inspector. The frame will turn into Auto Layout.
- Method: Select an element and press the key combination Shift + A - this way this object will immediately turn into Auto Layout, bypassing the frame stage.
Also in Auto Layout you can wrap several objects at once - just by selecting them.
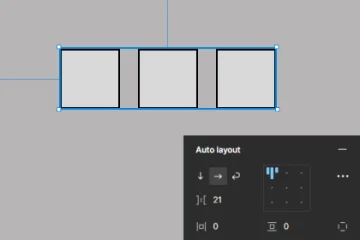
Let's look at the functionality of Auto Layout using an example:

As soon as we select it, the settings appear in the inspector on the right.
First comes the orientation of the objects (horizontal, vertical).
Next comes the distance between them inside Auto Layout.
Then the distance from the edge of the frame to its elements.
There is also the ability to snap objects to any edge or to the center.
Let's consider the Resizing setting (in the inspector in the frame) by default it is always "Hug contents", that is, "hug your content". When adding a new object, Auto Layout will expand so that everything will be inside it. In this case, all the settings that were initially applied to the new object.
If you select "Fixed width" (fixed width), then no matter how many new elements we add, the width of our Auto Layout will not change in any way, since it will be fixed. At the same time, you can add new elements, but they will go beyond the visible area Aut Layouot. And since Auto Layout is essentially a frame with advanced settings, we can use the "Clip content" setting and show or hide content that is outside Auto Layout.
This is a very interesting function. It helps with prototyping and many cool "tricks" of working with Figma that are not obvious at first glance are based on it.
Now let's look at how elements behave inside Auto Layout.
When selecting an object, we still have the Resizing setting. By default, the object also has it set to "fixed", that is, it will always be the same width and height, no matter how we change its parent frame. At the same time, we can always change the setting of this object itself, we can choose "Fill container" (fill its parent).
Accordingly, if we increase the width, then this object will also stretch after the parent.
All elements with the Fill container setting will fill the frame, while following the settings inside this frame.
Note that the settings work both horizontally and vertically.
Let's look at a specific example of the practical meaning of using Auto Layout in work.
Let's create a "Button" frame. Wrap it in Auto Layout. Make the corner rounded and add a fill.
In the edge spacing settings, set up the inscription. Now let's multiply these buttons and they will all have the same settings:

What does this mean?
That all the buttons in your project, if you create them via Auto Layout will have the same indents up, down, right, left. The distance settings will always be saved. At the same time, if you want to add some icon inside Auto Layout - you can always do it and all the distance settings will be saved. This is very convenient.
Designers always use Auto Layout in their work. Also, Auto Layout in addition to components is used in all more or less professional UA kits and design systems.
