Constraints in Figma
So, let's complicate the task a little and try to bind objects not only horizontally, but also so that they scale when resized vertically.
Despite the fact that in Figma this does not happen very often, it does happen.
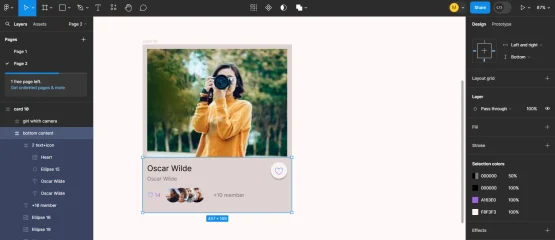
Here we have an example of a card:

Let's think about what and how we will bind here.
The girl's photo should be at the top and stretched in width to the right and left.
But in order for the photo to take up a certain part of the card itself, it needs to be given Constraints - top, bottom, right, left.
Next, we set up the rest of the structure. As you remember from the previous article you need to work from small to large.
Select user avatars, they should be on the left and at the bottom. Like and number of likes are also on the left and at the bottom. Text next to avatars is similar to the previous ones.
The top inscription and signature together with the heart in the circle are on a separate frame. Let's set up anchor constraints in parts, first the inscriptions - on the left, at the top, then the heart and circle - on the right, at the top.
Their parent frame Constraints will have - top, left and right.

General content frame "bottom content" - left, right, bottom (shown in the picture above).
Now we can check how our bindings work and pull the card in different directions.
The card is adaptive both horizontally and vertically.
