Figma Interface Overview
Let's create some document inside Figma. There are different ways to create a new file, I'll choose the easiest one: click on "+ Design file" in the upper right corner.
Let's figure out what's going on here. The first thing we see is the address of our file. It is located in the "Drafts" folder and is called "Untitled" (without a title) and here we can give it some name. The name should be relevant to what you will be creating in this file.
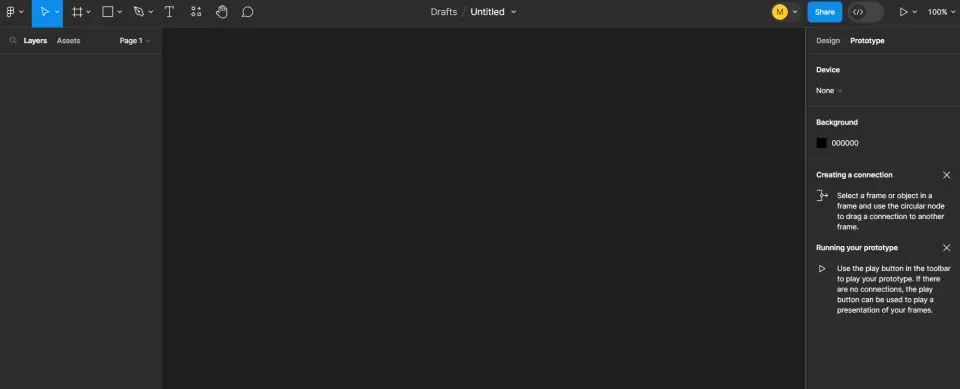
The internal interface of the program itself is very simple. It is divided into four large zones. On the left is the zone with layers (Layers). There is also a second tab here, "Assets" - this is where we will store the components.
Above this block is a block with primitives, the simplest tools of the program. At first glance, it may seem that these tools are not enough, but in fact, they are more than enough for a modern designer to work with.

On the right is the "inspector". In the inspector, you will see all the information about the selected object or group of objects.
There are several tabs inside the inspector.
First - the most basic and most frequently used Design tab, where all our work happens.
Second - Prototyping tab. This is where the part responsible for prototyping happens. And when creating animation, creating some interactions, creating prototypes of our future projects, you will work in this tab.
Third - Inspect tab. This tab is for developers. Here the information is presented, so to speak, in the language of "developers" and is not always clear to a simple designer. For my part, I will say that this information needs to be known and understood in order to become a more professional designer. But if you don't understand anything here at first, it's okay.
Also in the center, at the top, there is another panel, which contains a certain set of tools. We will also get to know them better in the following lessons.
And on the left, at the top, we have some technical information. Here you will see your avatar.
Next to it is the option to share the project (Share).
After that comes the ▶️ button, which allows you to view your presentation, that is, the prototype that you will create in the Prototype tab.
Next there is a block with a drop-down menu (100%), we will also study it in more detail in other lessons.
And of course, in the center we have our work area. In which the magic happens. The background color of the work area can be changed. To do this, you need to be in the Prototype tab and there you change the color of Background. You can choose any color in which you will be comfortable working.
