
Gradient in Adobe Illustrator
What is a gradient and how to work with it.
Gradient is a transition from one color to another. A gradient always consists of several colors, at least 2 of them. A gradient in Adobe Illustrator can be called a transition from one color to the same color, if the second color, for example, differs not in tone, but in opacity.
There are three types of gradient:
- linear
- radial
- arbitrary
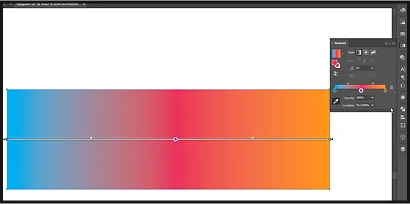
Linear gradient.
Create a rectangle and remove the stroke color from it. Click on the fill, find the gradient image in the menu and click. After that, the black and white gradient will be applied to the rectangle.
The black and white gradient is the default gradient.
You can also make a gradient in Adobe Illustrator in another way - create an object, press the G key and click on the object, after which the gradient will be applied to it.
If this is not the first gradient created in your file, then the last used gradient will be automatically applied to the object.
The gradient can be edited in the gradient palette. To do this, find it in the window menu and pin it to the work panel if you do not have it there yet.
To edit a gradient, select it and go to the palette. In the top line, you can select one of the types, but more on that later. You can also set the gradient angle. This function is relevant for linear gradients.
What is it?
For example, you created an object, applied any gradient to it and want to set the desired direction. Let's say you want the angle to be not 0 degrees, but 90. Or not 90, but 120. Edit the angles depending on your artistic goals.
We go down even lower and see a scale where the colors used in the gradient are on the right and left. Double-clicking on any of the tones will open a menu for editing colors by channels. Here you can also select a color palette from the suggested ones, use some presets from the swatches palette, or use the eyedropper to copy a color from another object.
You can also set the opacity for the color. Select a value from the list or set it manually (you can change the value in this or similar other palettes by simply scrolling the mouse wheel). The gradient color can also be changed by moving its "point" (stop), for this it is enough to grab it with the left mouse button and drag it to the side. In this way, you can radically change the gradient pattern.
The position of the "stop" can be changed manually or by setting a value in the field. The slider in the middle is needed for the same purpose - to regulate the amount of a particular color in the gradient. For example, you can move this "stop" all the way to one side. To further enhance the effect, drag the color "stop" after the "stop". The position of this "stop" can also be set manually or in the field.
If you hover the cursor over the gradient scale, you will see that an icon with a "plus" sign will appear next to the cursor.
What does this mean?
This means that if you click on the scale, you will create a new gradient "stop". The color of the new "stop" will exactly match the color on the gradient scale in which this "stop" was created. You can move it and change the color in the same way. The color can be changed both by channels and in the general palette. To do this, double-click on the fill color and select a color in the palette. The number of new colors can be created unlimited. But be careful with this, often unnecessary colors will lead to a loss of expressiveness of the gradient.
By clicking the "delete stop" icon, you will delete the color from the gradient. By expanding the menu, you can find a number of templates. For example, the Sky gradient.
Note that this gradient contains as many as 4 "stops", but since the colors differ in tone slightly, the gradient looks very harmonious.
By clicking on the Reverse Gradient command, you will swap the gradient "stops" on the gradient scale. In addition to the fact that you can edit the gradient in the palette, you can also do this by simply selecting the object and pressing the G key. Here you can also adjust the position of the "stops" and change the gradient angle manually.
In addition, you can reduce the gradient scale by dragging the anchor point, as well as move it, thereby changing the gradient pattern.
Radial gradient.
A radial gradient can be applied to both rectangular and polygonal objects, but a circle will be more representative.
A radial gradient is a circular gradient. In the case of a radial gradient, the Angle parameter is not relevant.
If you change the parameter responsible for the aspect ratio of the gradient from 100% to 150%, for example, the gradient will begin to represent an ellipse rather than a circle, and this will change its pattern.
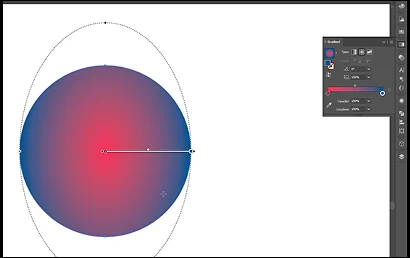
The Angle parameter is no longer irrelevant, now by changing the gradient angle you will notice how the color direction inside the object changes. You can adjust this setting in the menu, or by holding down and dragging the anchor point.
The center of the radial gradient can be changed by moving the gradient scale. You can also increase its radius by dragging the right black anchor point on the scale. You can also change the direction of the gradient by working with the left anchor point.
All other settings are identical to the linear gradient. Here you can also move the "stops", add new colors, change the shade, delete colors, work with opacity.
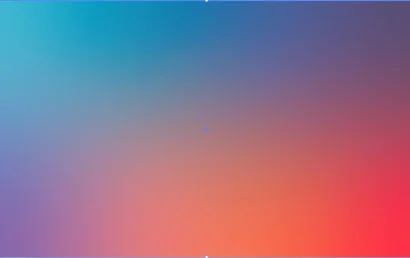
Custom gradient – probably the most interesting gradient that Adobe Illustrator has to offer. This is a fairly new tool, it appeared in Adobe Illustrator CC 2019.
Create any object and apply Freeform Gradient to it, and then you will have a custom gradient of completely random colors.
The first thing that catches your eye is the 4 gradient "stops".
Depending on the shape of your object, you will have a different number of gradient "stops". Each "stop" is responsible for its own color, as in the previous cases. However, all manipulations are now performed not in the gradient palette, but directly on the drawing itself, at least most of these manipulations.
You can move and delete each gradient "stop". You can delete "stops" both in the gradient palette and with the Delete key. You can also create new "stops".
Double-clicking on a "stop" will open color editing by channels, as well as changing the opacity.
You can delete colors by moving "stops" outside the perimeter of the object. If you hover over a gradient "stop", you will see a halo around it, on which you can see a manipulator. By dragging a point, you will increase the area of distribution of a particular color.
You can also do this by double-clicking on the gradient settings and changing the value in the field.
You can also create a custom gradient not with dots, but with curves.
To do this, switch to the lines tool, click anywhere on the gradient, or on an existing gradient "stop" and drag the cursor. You will get a guide. If you click the left mouse button, you will create a new gradient "stop".
Immediately after the second anchor point, the segment will change to a curve, and create the third anchor point by bending the curve.
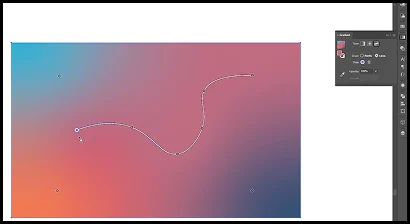
This method may be easier to build a chain of gradient "stops" if your drawing has some special shape.
To reset the curve, just press the escape key.
The created gradient "stops" on the curve can of course be deleted and their colors can be changed, and you can also change their opacity, but you cannot change the color distribution.
It is very convenient to make backgrounds with an arbitrary gradient. Due to the flexibility that this tool provides, you can make the finest color adjustments, and this is very cool.
Gradients are very often used in creating identities, in printing and many other places.
The most important thing for you is to learn how to organically select colors. The Itten circle, color schemes and Adobe Illustrator templates will help with this.