
Creating Primitives and Simple Objects in Adobe Illustrator
In this article we will look at how to create primitives and simple objects in Adobe Illustrator.
Primitives in vector graphics are circles, squares, polygons, points, curves.
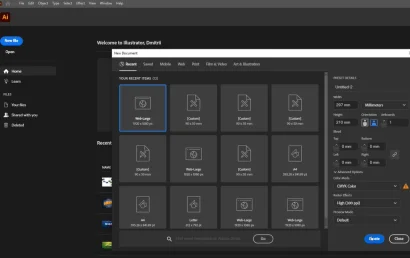
First, let's create a new artboard.
Click on the New File command or press the Ctrl N key combination. Create a file measuring 297x210 mm. (at the moment, the size and format are not important) One artboard, bleeds are not needed, the color model will be CMYK (also not important). Let the resolution be 300 ppi, preview mod – default.
Do not touch the advanced settings. These settings are intended more for printed products. If your project is going to print, then the color model should be only CMYK, and not RGB. Also, if the project is going to print, choose an increased ppi. Next, click Create.
The first thing to start constructing almost any drawing is a segment.
Let's look at the Line Segment Tool for creating a segment.
In general, it is more convenient to draw segments with the pen tool, but we will study this in another article. First, you need to know that there is such a tool as a segment.
By opening the segment menu, some tools become available to us. For now, we are only interested in the segment (the very first of all). Select it, move the cursor to the artboard, press and hold the left mouse button, and then drag the cursor.
Please note that while drawing a segment, we see the angle at which we do it, and we also see its length.
To draw a segment strictly horizontally or at an angle in 45 degree increments, hold down the Shift key.
By holding down the Alt key, the segment will begin to be drawn in both directions at once, from the point at which you began the drawing process.
You can change the length and angle of a segment using the Selection Tool after you have drawn it. To do this, simply select this tool, hold down the extreme support point of the segment on any side and drag.
You can also change the length and angle of the segment in the Shape tab, in the Transform palette, and in the dynamic panel at the top.
Note that the segment height is 0 pixels. No matter how much we rotate it, the segment will not change its appearance because it does not have its own thickness.
Only its stroke has thickness. The stroke thickness is set in this menu:
The segment itself is not an object that must have width and height.
The segment is This is a skeleton that does not have its own density and volume. If we move the segment to a vertical position, the width value will go to the height value, and the width will be completely zeroed.
Creating primitives and simple objects in Adobe Illustrator always starts with this tool, or rather with this group of tools.
By default, you will have a rectangle on the cover of this entire group, but if you hold down the left mouse button, the menu will expand and you will be able to see what other objects can be created.
The main tools that interest us are a rectangle, a rectangle with rounded edges, an ellipse, and a polygon.
Let's select the rectangle tool. Next, hold down the left mouse button anywhere on the artboard and drag the cursor in any convenient direction. When you finish creating a rectangle, simply release the left mouse button.
To delete an object, just press the Delete button.
Let's select the rectangle tool again, but this time hold down the shift key while creating it.
By holding down shift while creating a rectangle or, for example, an ellipse, you will get a perfect square or circle.
How are objects created in Adobe Illustrator?
The object is created from the point where the cursor is located and follows the cursor movement. It is most convenient to create objects from left to right and top to bottom, but you can do it any way you like, from right to left, from bottom to top, and in general as you like.
If you hold down the alt key when creating an object, it will be created from the point where the cursor is located.
However instead of following the cursor, the object will be created moving away from the starting point. If we connect the shift key, then our rectangle, if it is a rectangle, will take the shape of a perfect square. The same will happen with an ellipse, the ellipse will turn into a circle.
If we connect the space key, then the resizing will stop and the object will be captured and start moving along with the mouse cursor. By releasing the space key, you will stop moving and return to editing.
Releasing shift will switch from a regular square to a free-form rectangle. Releasing alt will return to the basic object creation settings. But the space key for moving is not very convenient.
A more practical option is to simply select the selection tool after creating the object and move the object using this tool. Let's switch to the selection tool – selection tool.
You can also do this using the V key. With this tool, we can select a rectangle by clicking on it, and also move it to any point on the artboard or workspace. You can select an object not only by clicking on it once, but also by grabbing it with a rectangular lasso.
To do this, hold down the left mouse button on the artboard and drag the cursor. This method is very convenient when you need to grab several objects at once. If you hover this tool over the side edge of an object, you can edit this object.
Notice how the cursor changes its appearance. As soon as you see this, hold down the left mouse button and drag in any direction. The rectangle will begin to change size.
You can work with any other side in the same way. In addition to dragging the side edges, you can also hover over the corner of the rectangle and drag it. The size will also change.
We also have a dynamic panel where we can also change the size of objects. By removing the lock, you can customize the parameters individually. Next to it in the cell - change the rounding of the corners and set any value. After that, you can change the type of corners. Now they are rounded.
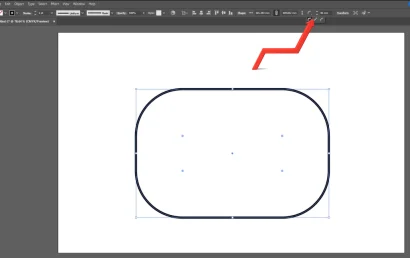
Pay attention to the round manipulators on the object. With these manipulators, we can arbitrarily change the rounding of the corners of objects. Let's move the cursor to one of the manipulators, hold down the left mouse button and simply drag the cursor to the center of the object.
The rounding of the corners will begin to change, and you will see it in real time. To see at what mark you fixed the rounding and perhaps somehow edit it, you can turn to the dynamic panel. Let's go back to sharp corners and imagine a situation when you need to round, for example, only one corner.
To do this, hover the cursor over the manipulator and click on it. After this action, it is not necessary to hold down the left mouse button, the cursor can generally be moved away, but try not to interact with the workspace or the object anymore, because if you click, for example, on the object, the selection will be removed from the manipulator, if you click on the artboard, then the selection will be removed from the entire object.
Notice how the manipulator changes its appearance, and after that you can hover over it again and pull it inside the object, rounding not all the corners, but only the one we need.
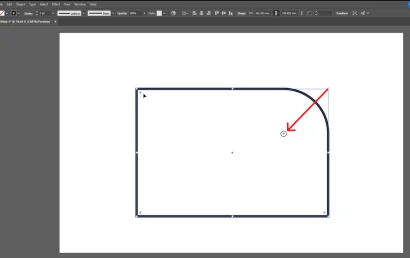
Thus, we can round each corner of the object individually to different values.
To rotate an object by a certain or arbitrary degree, hover over it, and when it takes on a different appearance, simply rotate the object.
To go back a step, use the keyboard shortcut Ctrl-Z.
To manually change the angle of rotation of an object, go to the transform palette. It shows the current angle of rotation. We can also change the angle of rotation in equal increments of 45 degrees. To do this, as in the case of a segment, simply hold down the Shift key while rotating. We can rotate an object in more than just these two ways.
Return to the dynamic panel and open the Shape tab. Here you can also change the width and height of the object, change the angle of rotation, change the rounding of all or some specific corners. This will allow us to make a lock.
There are also completely new commands for us here - Scale Corners - scalecorner scaling, Scale Strokes and Effects - scaling strokes and effects.
What is corner scaling?
Let's say you created a rectangle and rounded its corners.
Then you copy it and make it smaller. If you activate the rounded corners function beforehand, then when you increase or decrease the objects, the rounded corners will not change. If you disable this function - when decreasing or increasing, the angles will increase or decrease.
Scaling strokes and effects.
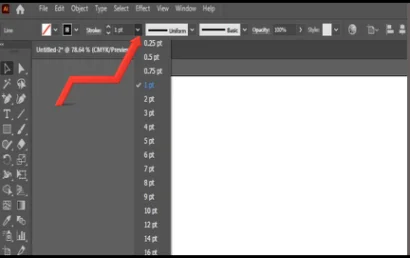
Let's change the stroke thickness. You can do this by first selecting the object and going to the Stroke menu. Traditionally, stroke thickness is measured in points.
Points are typographic units of measurement. One point is equal to 0.3528.
To change the units of measurement (default), go to Edit – Preferences – General or just hold down the Ctrl-K keyboard shortcut. Then go to the Units tab. Find Stroke. Here you can change the units of measurement for the stroke thickness. By default, there are always points, but you can choose something else. My advice to you is to leave this default value, we will measure the stroke in
points. Return to the Stroke menu and set the thickness for our stroke. Let's say it will be 20 points.
Copy the rectangle. Return to the Shape tab. Check the ScaleStrokes and Effects box and reduce or increase the given object.
Note that when you change the size of the object, the stroke thickness changes. Now let's uncheck this box and repeat the action. Its thickness will not change.
The same commands Scale Corners - scaling corners and Scale Strokes and Effects - scaling strokes and effects can be found not only in this small menu, but also in the global menu, which we have just been in. Press the Ctrl-K key combination and find these two commands in the General section. Check or uncheck the boxes and click OK.
How else can you create objects in Adobe Illustrator?
Let's select the rectangle tool and click on the workspace. After that, a menu will appear where we can immediately enter the necessary parameters for the future primitive. Your object will appear exactly where you click the mouse.
Let's now try selecting the rectangle tool and holding down the Alt key.
Notice how the cursor has changed. It will look like a crosshair. With such a cursor, it will be very easy to aim at the center of the artboard. We aim at the center, click the mouse and create an object.
This way, the center of our created object will be right in the center of the artboard.
We don't have tohold down Alt in order to aim at the center. The cursor just visually changes so that it becomes more convenient to do this.
To create a rectangle, you can use the M hotkey.
To create an ellipse, use the L hotkey.
To create a perfect circle, you need to hold down the Shift key. A circle is a type of ellipse. Therefore, you can call a circle an ellipse. Our object will now change, and accordingly, the set of commands in the Shape menu will be partially different.
The Rounded Rectangle Tool creates a rectangle with rounded corners. If we create it not arbitrarily, but by clicking on the artboard, then the rounding function of the corners will be added to the width and height.
The Paligant Tool is a hexagon by default. However, when creating a polygon by left-clicking the mouse, you can set the desired number of faces in the Sides column. We can also set the radius.
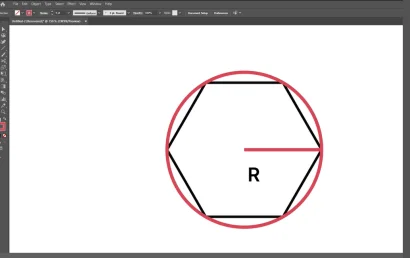
What is the radius in the case of creating a polygon?
Imagine that we drew a polygon and built a circle around it. So the radius of this polygon will be the segment from the center of the polygon to the circle. If we draw a segment from the center of the polygon and draw it to any and3 corners, then we get the very radius that Adobe Illustrator asks us about.
To increase or decrease the number of faces and corners when creating a polygon, select the Polygon tool, stretch it on the artboard and, without releasing the left mouse button, start pressing the upper or lower arrow on the keyboard, increasing or decreasing the number of faces and corners.
The Star Tool creates a star. And just like with the polygon with the arrow keys on the keyboard, we can increase or decrease the number of vertices of the star.
The Flare Tool will create a glare. This effect itself does not have any special artistic value, and it does not fall under the category of primitives either.
In the next article we will look at the Shaper tool and Shape Builder Tool for creating shapes.