
Adobe Illustrator Toolbars, Their Structure and Functionality
Let's look at the working panels of the Adobe Illustrator program, their functions, structure and functionality.
We have 4 toolbars, 3 of them are functional and one is informational.
The information panel is a thin panel at the bottom. It is also called the status bar. Here we can see which artboard we are using, its size and rotation angle.
If we change the rotation angle and then want to return it to how it was, then it is enough to manually enter 0 degrees here or just press Esc. The name of the tool we are currently interacting with is also shown here.
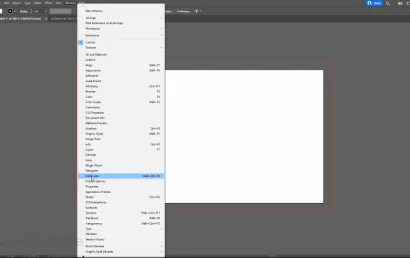
The top panel, like the bottom one, is informational, but it is also functional, through it you can perform more commands.
This panel is also dynamic, which means that it will change depending on what we do in real time. The number of displayed settings and functions in this panel can be adjusted.
To do this, go to this menu (three stripes) and check or uncheck the boxes. But for now we don’t know what exactly we need and what we don’t. Therefore, for now, we check all the boxes.
Usually this panel in Adobe Illustrator is located at the top, but if you want, you can lower it down. To do this, use the doc to bottom command. To bring it back, use the doc to top command.
There will also be a tab (similar to a telephone battery). In it, you can select the most convenient interface type for you from the list. It all depends on what kind of work you do (drawing, design, layout).
You still don’t understand which tools you need and which you don’t. So let’s customize this panel together. When you learn how to work in Illustrator, you will definitely do it your own way.
All you need to know is that all available tools are in theWindow tab.
Let's say you're just starting to customize your toolkit, and you absolutely don't want to have any extra icons in the menu that offer various presets. Here you can choose only what you want to see in your toolkit.
The first thing I always add to the work panel is the Pathfinder palette. The Pathfinder palette is one of the whales of Illustrator. It should definitely be in your arsenal.
You need to find this palette and click on it, after which it will appear in your workspace, in the form of a window. Let's leave everything as is for now and continue choosing the tools we need.
The second thing I'll add is these are Layers. Layers should always be in your arsenal.
Third, – these are tools for working with color. The palette we need is called Color. We won’t get far without tools for working with color, and it doesn’t matter whether you’re just starting out in Illustrator or you’re already an experienced designer, the Color palette should always be at hand.
Right after the Color palette, we look for gradients. Gradients are an integral part of the toolkit for working with color.
The next palette we need is Transparency – transparency. We will work with transparency and overlap effects quite often, so we definitely need this palette.
Next, of course, we will need tools for working with text. To do this, find the Type item in the menu and select Character.
And the last palette that I will add to this list appeared only in the version Adobe Illustrator 2022 - this is the palette for working with 3D.
To move the palettes, just hold down the left mouse button and drag the cursor.
A blue glow will appear at the moment of docking. It indicates that if we release the palette now, it will be magnetized to the side panel. We release the palette, and it wedges into the side edge.
We can also compose our palettes. For example, let's pull the Gradient palette out of its place and try to place it next to the Color palette. We can do the same with the Transparency palette.
You can compose other palettes in this way. We can also dock palettes with each other in this panel, or we can group them.
To do this, you need to bring one palette closer to another, and when the palette to which we bring the current palette lights up blue around the perimeter, we release our palette. If you do, then the next time you open these two palettes, they will open as a group in one window. To collapse the palette back into the panel, click on the arrows.
To separate them, just drag one and lock it next to it as a separate palette. The next time you open it, it will expand on its own. Also, any palette can be moved to another place at any time, and it can also be unpinned from the panel and closed.
If you need it again, we go to window again and look for it there.
To return it back, go to the Window menu - Toolbars and select Basic or Advanced. We hold down this grid, just like last time, and move the panel to the left edge of the interface.
As soon as the blue backlight lights up, we release it. By default, the Advanced panel will be in two columns, but by clicking on the arrow, all the tools will line up in one column. In addition to the fact that we can use presets for this panel, we have the ability to completely reassemble it at our discretion.
To do this, unpin it from the side edge and close it. Then go to Window – Toolbars and click on New Toolbar. Name it and click OK. Next, click on the three dots, and a menu with all the available tools for work opens.
We can craft a completely turnkey toolbar by simply dragging and dropping. You can place tools in different cells or group them. To see which tools we have grouped, hover over them and hold down the left mouse button, after which an additional menu will open where you can see all the grouped tools.
For now, let's still use the Advanced workbar. Go to Window -> Toolbars -> Advanced. For now, we will work with it.
And finally, let's look at one more small menu module. These are two squares. The white square is the fill color. By default, it is always white. The black square shows the stroke color. By default, it is always black.

What does this mean? If you create an object right now, the fill color will be white and the stroke color will be black. We will study the tools for working with color in detail later, but for now, let's just get acquainted. Double-clicking on any of the squares will open a palette where you can generate any other color.
We also have an arrow that will swap the fill and stroke colors. There is a hotkey combination for this command Shift-X.
And just below we have three squares. The first one shows us the current fill or stroke color. The second one shows the current gradient. Right now we have a black and white gradient. This is the default one. The third square in turn will remove the color of the stroke, fill or gradient.
And finally, let's save our workspace that we just created.
To do this, we need to go to Window, hover over Workspace, then select New Workspace, name our work somehow, and click OK.
In the next lesson on Adobe Illustrator we will talk with you about the hierarchy of workspaces, scaling the interface and exporting.