Working with light in 3D
Adjusting the direction and size of light sources.
We analyze the basic principles of lighting in 3D using examples.
In 2019, Andrew Price, the famous creator of the online resources Blender Guru and Poliigon, developed a video course that is designed for beginners in the field of 3D art and is dedicated to working with light.
In his lectures, Andrew lays out five fundamental rules of lighting that will help artists create realistic images of characters and environments. He backs up the theory with concrete examples from renderings, photographs, paintings and films. In this article we present the main ideas from this course, including tips on adjusting the direction and size of lights.
Lighting Lectures by Andrew Price
In Part 1:
-
Often in books and courses on working with lighting, there are some important aspects that are not given due attention. These omissions may include specific problems or situations that may arise when working with lighting.
-
The direction of light plays an important role in creating atmosphere and mood in scenes with characters and environments. It can emphasize the shape of objects, create shadow and highlight effects, and add depth and dimension to an image. Working with the direction of light requires care and creativity to achieve the desired effect.
-
Choosing the right size of the light source is also important. A small light source will create harsh shadows and strong contrasts, which can be useful for creating dramatic effects. A large light source, on the other hand, will create softer shadows and more even illumination, which can be preferable for creating a more natural and realistic look.
- The golden hour, the time around sunrise or sunset, is often considered the best choice for landscape photography. At this time of day, the light is softer, with warm and golden tones. This gives landscapes a special atmosphere and creates beautiful long shadows. However, there are exceptions where other times of day may be preferable, depending on the specific mood, effect or story you want to convey through a photograph or landscape image.
Every 3D artist has undoubtedly encountered situations where a small change in the position of the light source significantly improved the visual perception of a character render. The same applies to landscape scenes: just change the direction of the sunlight and the render will come alive with new colors.
There are images that create a boring impression, and there are those that you can’t take your eyes off. Often, this depends not only on the content of the scene or the attractiveness of the characters, but also on the lighting, which plays an important role. You can always change the color of the shadows or highlight certain areas to give them depth, as artists of the past did in their paintings, expressing their own vision.
There are many books and courses on working with light, and they all have their advantages. However, when studying these materials, Andrew noticed one drawback: they often suggest specific methods, for example, arranging three light sources for one character.
The problem is that it can be difficult for an artist to determine what to do if his situation is different from the examples given. What if there are not one but two characters in a scene, one in the foreground and one in the background? What if they are in a 3D environment, like a city? Tutorials don't discuss how to work with light in these situations.
However, there are five basic elements that can be used to create impressive lighting in any composition. These elements include light direction, size, color, readability, and emphasis. By understanding each of these, a 3D artist will know what steps to take to achieve specific results.
Andrew Price has collected answers to a number of common lighting questions in his tutorials:
- How will changing the various lighting elements affect the composition?
- Why do certain In some situations, moving a light source may be undesirable?
- How do I use large and small light sources correctly?
- What lighting options are best for characters and environments?
In these lessons, Andrew looks at how changing lighting can affect the overall composition of a scene. He also explains why, in some cases, moving a light source can ruin the desired effect. Andrew also provides advice on using different light sizes, explaining how they can affect perception and create the desired atmosphere. Finally, he looks at different lighting options that work for characters and environments, helping artists choose the most appropriate lighting style for their projects.
Direction
The direction of light has a huge impact on how objects are perceived. We've all seen how a person's face changes when a flashlight is pointed at them from below or from the side. This is an example of how light rays can change the shape and perception of an object. For example, even without any additional explanation, when looking at the image below, we can easily identify it as a circle.

However, once we learn that it is a three-dimensional figure, we can no longer identify it without any clues, since without lighting it is impossible to determine the shape of the object. Although we may assume that it may be a sphere, in reality it may be a cone, disk, cylinder, or other shape. The true shape of an object only becomes clear through the shadows that are created by the direction of the light.
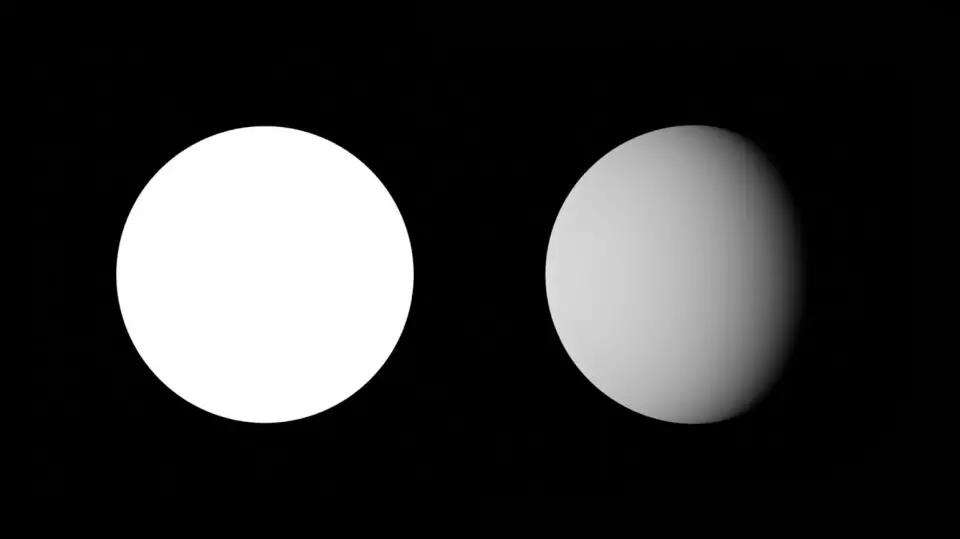
One of the important things a beginner should learn is to embrace shadows, not avoid them. Shadows are an integral part of a 3D artist's work and are as important as lighting. They play an important role in defining the shape of an object and the overall composition. Without shadows, it is impossible to fully perceive the shape of an object and evaluate it in the context of the scene.
Character Lighting
When it comes to lighting a character, it is important to avoid placing the main light source in front of the object. This is a mistake, as the front light can make the form flat and deprive it of volume.
For example, if you have a muscular character that you have worked hard on, and you place the light source from the front, then small details such as protruding abs may not be noticeable to the viewer. However, if you move the light source to the upper left corner, then a shadow will be created that will visually highlight the unevenness of the model's surface and add volume.
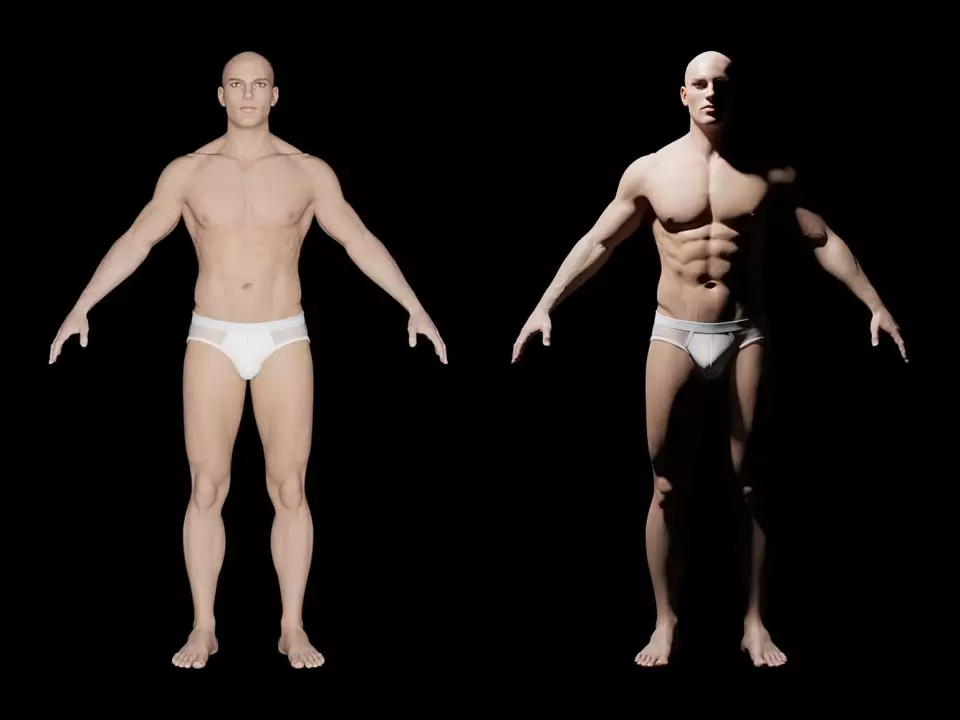
With the right direction of the light source, you can emphasize all the details: abs, pectoral muscles, veins on the arms and other protruding parts of the muscles. However, the opposite effect also exists. When lighting from above, shadows can emphasize unwanted shapes.
Let's look at some practical techniques for working with light.
When lighting the foreground, if the light is positioned in front of the face directly behind the camera, it can appear flat. The viewer will not have an idea of the shape of the nose, cheekbones, placement of the ears, etc. This type of lighting often creates a flash effect, which in most cases is undesirable, as it «flattens» the shape of the face.
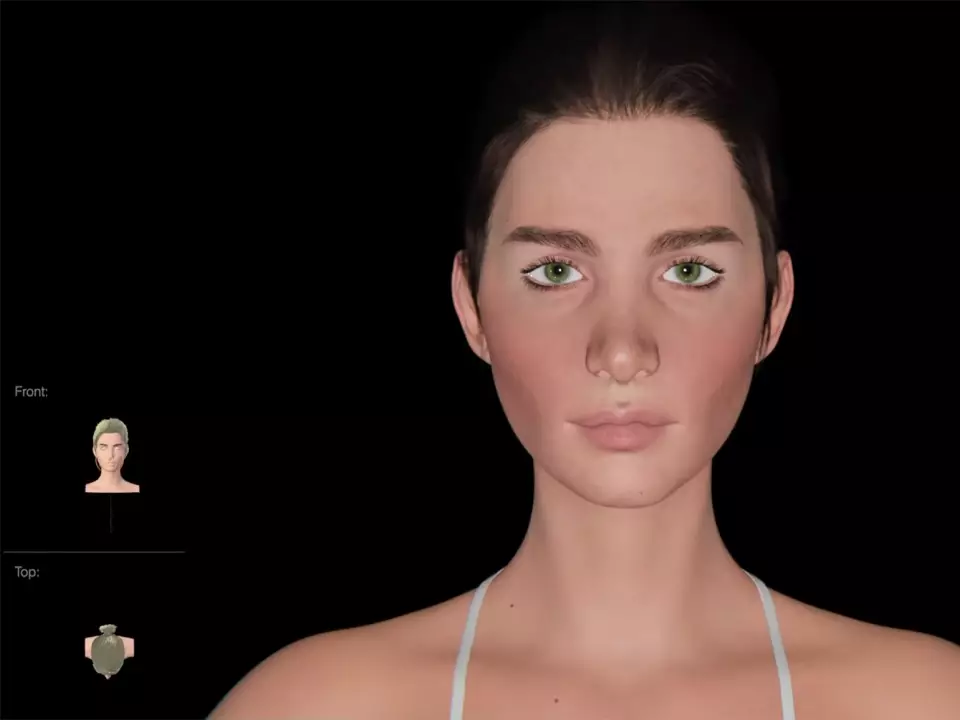
Despite the above-mentioned disadvantages, there are cases when this type of lighting is required and is targeted. For example, when shooting for a catalog, where it is important to emphasize the print on the clothes, and not their texture, or during a photo shoot with tattooed people, where the main element of attention is the tattoos themselves, and not the person's figure.
When moving the light source a little higher and back, the face can undergo dramatic changes in perception.
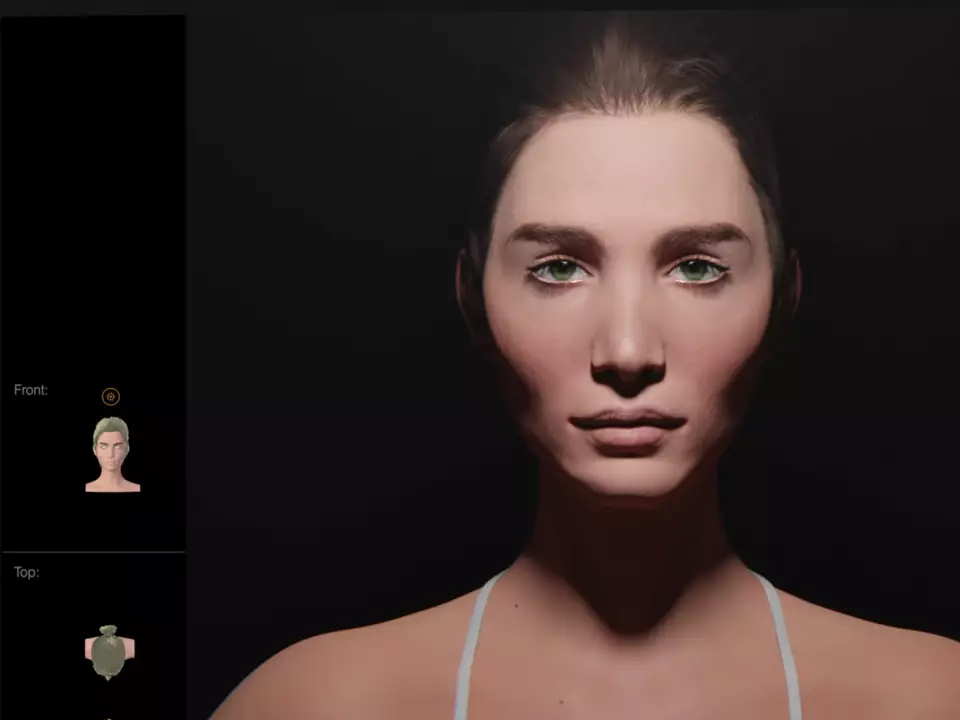
This lighting method is called "Paramount lighting" or "butterfly lighting". The name Paramount comes from the film company of the same name, where this type of lighting was used to create a glamorous look on set.
This approach creates small shadows that help to highlight the shape of the character’s nose, lips, chin, and cheekbones. A special feature of this style is the shadow that hides the neck and creates space between the head and the body. The main advantage The advantage of Paramount lighting is its ability to draw attention to the model's eyes.
Photographers often use this technique for shooting in glossy magazines and in the fashion industry. It is worth noting that large light sources with subdued brightness are used for this type of lighting (we will look at them later). The result of this type of lighting also depends on the pose and turn of the model's head, but in any case, the light source is always located above the camera.
If the light source is located above the subject, dark circles will appear on the face, and the outlines will become threatening, which can evoke associations with the skull.
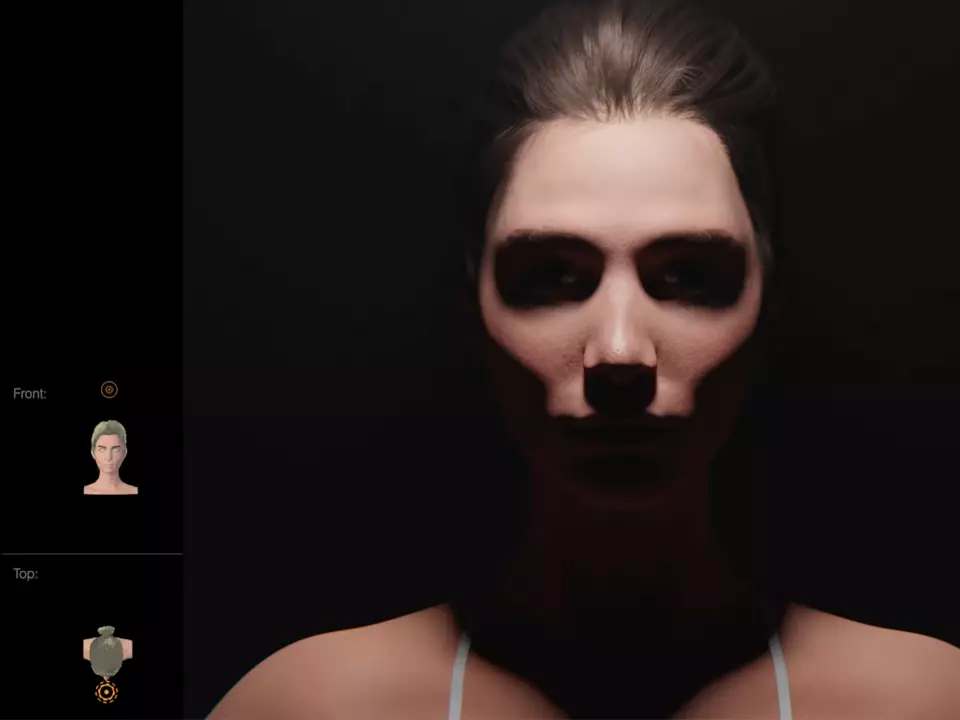
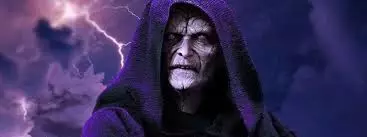
While overhead lighting can highlight unwanted shapes, there are instances where the effect is necessary, particularly in the horror genre or when introducing an antagonist into the frame. The sinister appearance of Palpatine in the Star Wars series is a good example, where overhead lighting is used to highlight his signature makeup and create a menacing appearance.
In some cases, a light source that shines from above and creates dark circles under the eyes can be used to create a "panda" or "raccoon" effect. While this type of lighting is not generally desirable for filming, it can be useful when you want to emphasize a tired or depressed character.
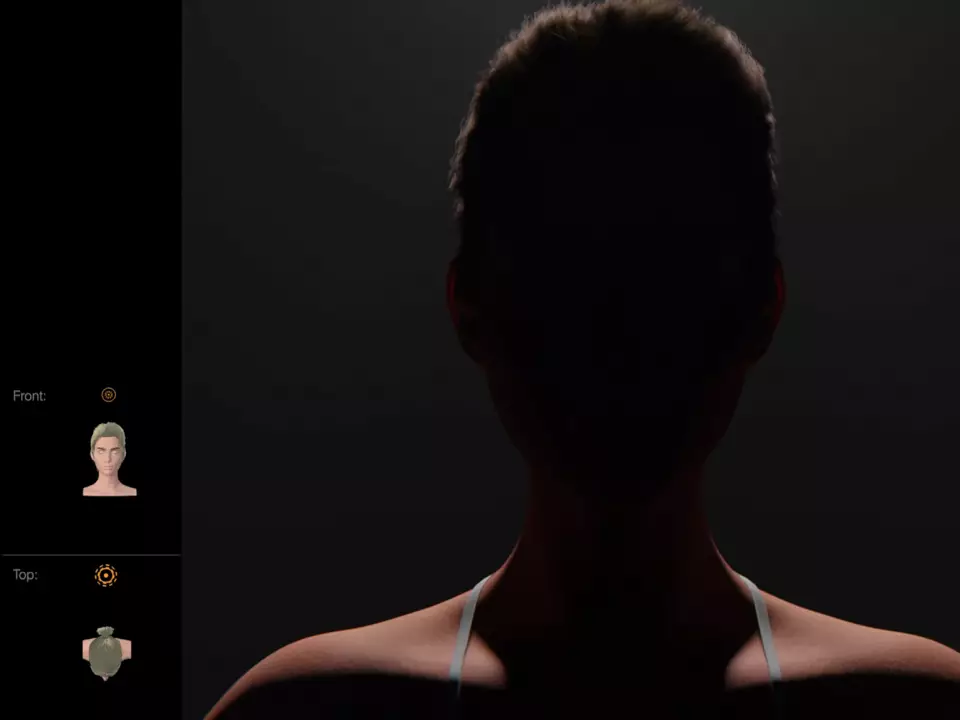
Moving the light source behind the subject will result in the viewer seeing only the model's silhouette. This classic technique is often used in films when the director intends for the character to remain incognito to the viewer.
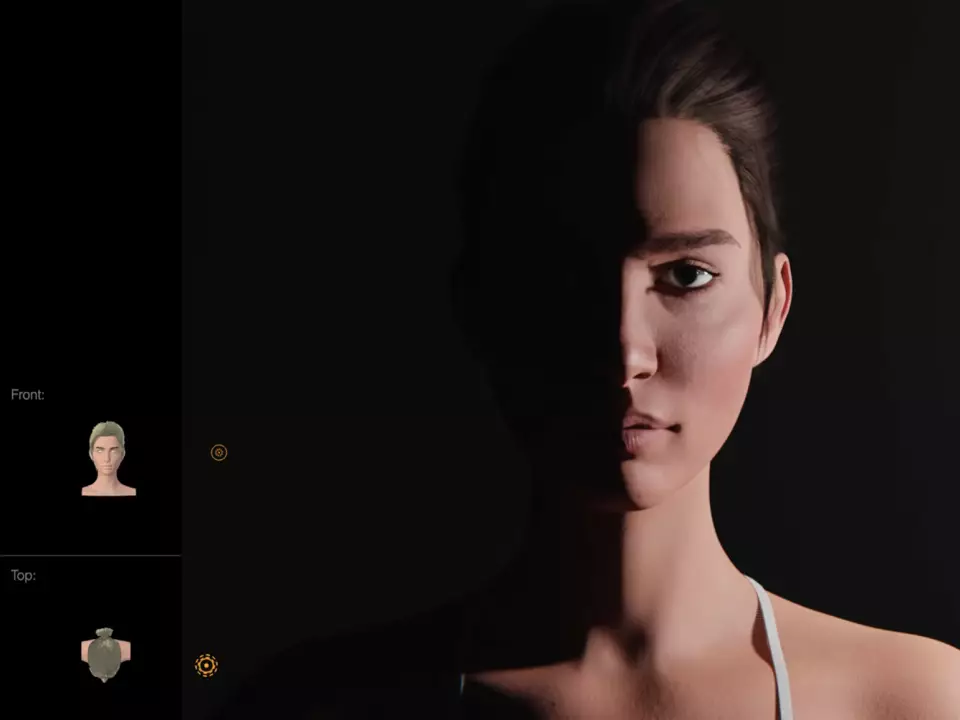
With side lighting or split lighting, the light source is moved to the side, resulting in only half of the subject being illuminated. This technique can create interesting effects and draw attention to a specific part of the subject.
Split lighting is widely used in a variety of contexts. For example, in fashion photography, it can be used to emphasize the shape and lines of clothing, as well as to create a play of light and shadow on the model. In film, side lighting can be used to create dramatic effects or to emphasize the emotions of characters.
However, it should be noted that when using split lighting, it is necessary to provide sufficient lighting for the other half of the object to avoid complete darkness and loss of detail.
Using bottom lighting when working with a model creates associations with a storyteller of scary stories and can serve as a hint that the character has something to hide. This technique adds mystery and creates an effect of tension in the image of the model.
When light comes from below, it creates deep shadows and increases contrast on the face and other parts of the body. This can add mystery to an image and highlight certain facial features or details of the model.
This lighting technique is often used in photography or film to create a dramatic, mysterious, and magical effect. It can be effective when shooting for genres associated with horror or fantasy stories, as well as for creating images that require a special atmosphere or expression.
It is important to remember that each lighting technique has its own characteristics and can be effective in certain contexts or for certain aesthetic purposes.
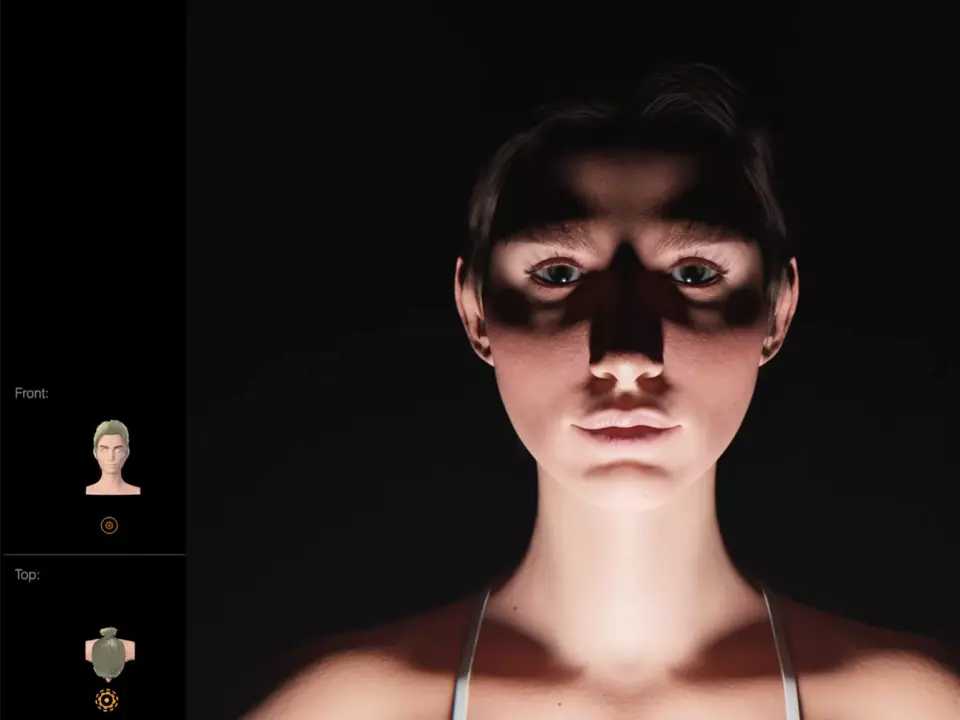
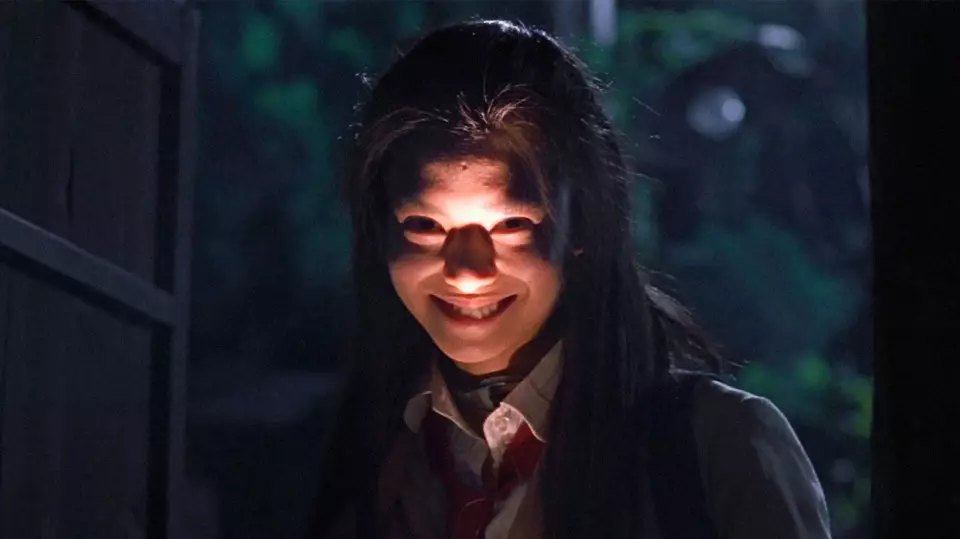
The question of why underlighting is often used in horror films and why it is seen as scary has several aspects, and the scientific explanation can be complex and multifaceted. Here are some possible explanations:
- Psychological Effect: Underlighting can create feelings of discomfort and uneasiness in the viewer because it is different from typical natural lighting. Such unusually lit scenes can violate the viewer's expectations and create a feeling of tension and anxiety.
- Associations with unusual images: Underlighting that creates shadows and emphasizes certain facial features or details can create images that are associated with horror, fear, or madness. For example, shadows emphasized under the nose can create an association with a skull or displaced facial features, which can create an unpleasant feeling for the viewer.
- Media-cultural influences: The use of underlighting to create a scary effect has been widely used in film and other media, especially in the horror genre. This has created a kind of convention in whichoh viewers have come to associate low lighting with horror or frightening scenes.
It is important to note that lighting effects and their perception can vary depending on context, directorial intent, artistic style, and individual viewer preferences. Human perception of light and shadow is a complex phenomenon, and scientific explanations for specific lighting effects in the context of horror scenes may require further research.
Neutral lighting placed in the upper left or right corner at a 45° angle creates a more even illumination of the subject and allows the viewer to see details and outlines of its forms. It creates a distinctive triangle of shadow under the eye on the side farthest from the light source.
This type of lighting is typically used to achieve a more natural and balanced visual effect. It allows for enough brightness to be visible on the subject without creating too many shadows or extreme contrasts.
Neutral lighting can be preferred for many scenes and styles of photography or filmmaking where it is important to convey the subject with authenticity and preserve its natural appearance. It can be used in advertising, portraits, fashion shoots, and other situations where it is important to achieve a balance between lighting and subject detail.
Neutral lighting creates a more objective visual impression, where the viewer can see the subject in full without significant distortion or emphasizing certain features.
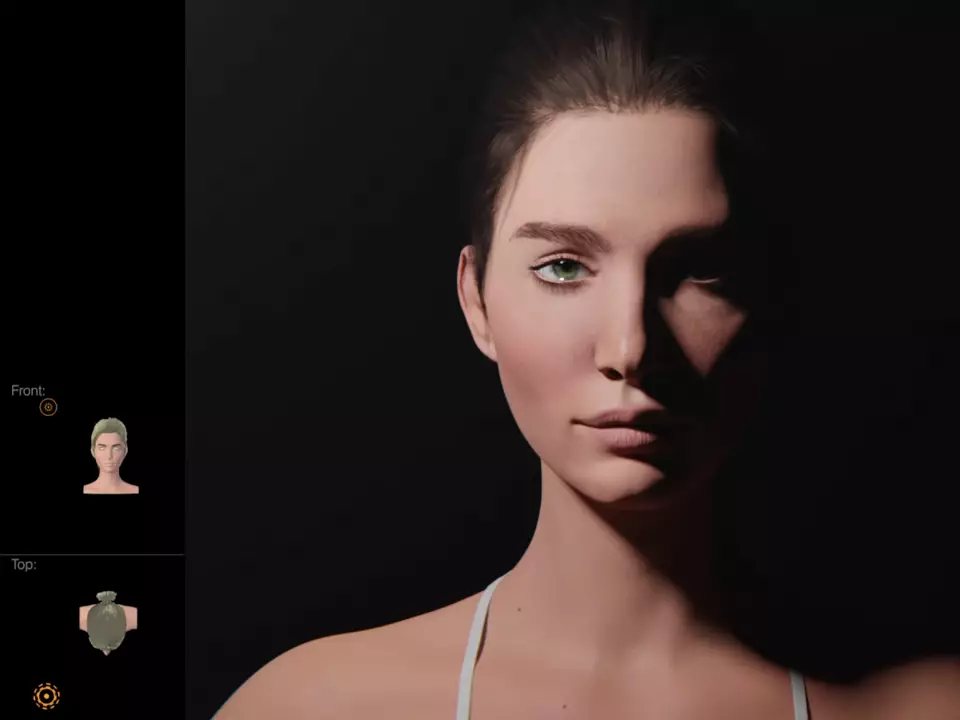
The lighting technique known as Rembrandt light or top left light is versatile and widely used in a variety of situations. It can be used indoors with artificial lighting as well as outdoors with natural light.
Rembrandt light is named after the famous 17th century Dutch artist Rembrandt van Rijn, who often used this technique in his works. The peculiarity of Rembrandt light is to create strong illumination of an object on one side, while the other side remains in shadow. This technique creates the effect of volume and depth, and adds intrigue and drama to the scene.
It is important to understand that all the presented types of lighting should not be considered as strict guidelines or rules, but rather as a set of tools that an artist or photographer can use depending on the context and goals of the work. Each technique has its own characteristics and effects, and the choice of one or another option depends on the desired visual result and artistic intent.
For example, to create a horror visualization, you can use techniques that evoke a sense of horror and discomfort in the viewer, such as underlighting or side lighting. On the other hand, if the character is supposed to be attractive or interesting, then more neutral lighting options, such as neutral or Rembrandt lighting, may be more appropriate.
Ultimately, the choice of lighting technique depends on the goals, context, and emotional impact the artist or photographer wants to achieve.
Environmental Lighting
When it comes to environmental lighting, shapes also play an important role in creating atmosphere and visual impact. The shapes of the objects being illuminated can be used to enhance or change the mood of a scene.
For example, sharp angles and hard lines can create a sense of tension or severity, while rounded shapes and smooth lines can give a scene a softer, more subdued character.
It is also important to consider how the light falls on objects in the environment and how the play of light and shadow is created. This can emphasize or change the shapes of objects, add depth and volume to a scene.
In general, ambient lighting and working with shapes allow artists and designers to create different effects and visual impressions, as well as influence the perception and mood of the viewer.
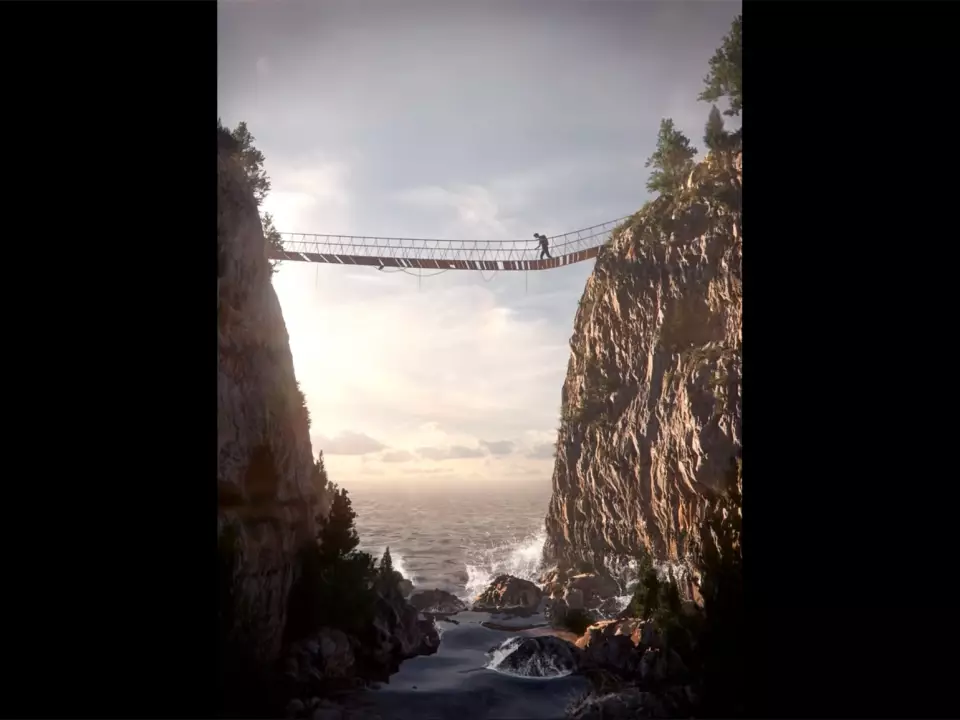
The use of lighting at different times of day and contexts plays a significant role in creating points of interest and directing the viewer's eye. For example, in Andrew's rock painting tutorial, the sun placed in the background creates sharp shadows on the rock, emphasizing its relief and drawing attention to that part of the scene.
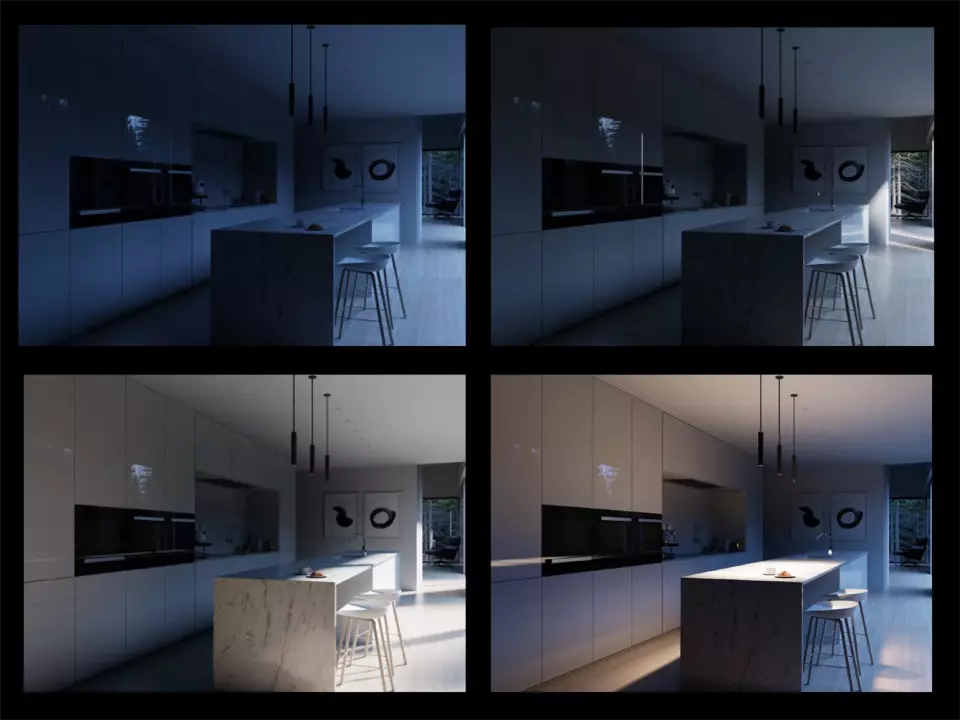
Time of day is also important ie. At midday, when the sun is directly overhead, the lighting is usually more even and flat, making it difficult to see details of the environment. However, as sunset approaches or at other times of the day, additional shadows appear that can create interesting accents and shape the composition of the scene. In environment renders and architectural visualizations, lighting is used not only to emphasize forms, but also to create points of interest and control the viewer's perception.
Lighting therefore plays an important role in creating effects, directing the eye and controlling perception in different contexts and times of day.
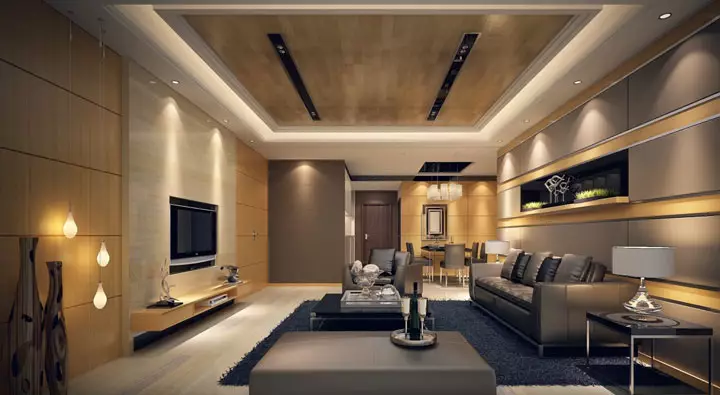
This is also confirmed in interior design.
So, to sum it up:
Remember that the direction of light affects the creation of shadows, and shadows, in turn, determine the shape of objects. In environmental scenes, light plays a more important role in shaping the composition than the shapes of the objects themselves, although sometimes the shapes are also emphasized.
However, care must be taken when choosing a shape, as it can highlight unwanted details or negatively affect the composition. Therefore, before setting up the lighting, the artist must clearly define what message he wants to convey to the viewer and how he wants to control their perception.
Thus, remember that lighting plays a key role in creating mood, emphasizing shapes and composition, and directing the viewer's gaze. Experiment with different types of lighting and shapes to achieve the desired effect and create impressive visual compositions.
Size
Determining the exact size of the light source is as important as choosing its direction. Light size refers to the physical size of the object that emits light.
In Blender, for example, you can use an object with an Emission shader that can be scaled to the desired size. For standard lights, such as point lights or spotlights, the size can be determined by their radius. Interestingly, you can even use a surface for lighting, for example by pointing a spotlight at a wall to turn it into a large diffuse light source.
Thus, determining the correct size of the light source affects the visual effects and atmosphere of the scene. Using different methods of scaling and adjusting the size of the light source allows you to achieve the desired visual effect and create an atmosphere that matches the artist's intention.
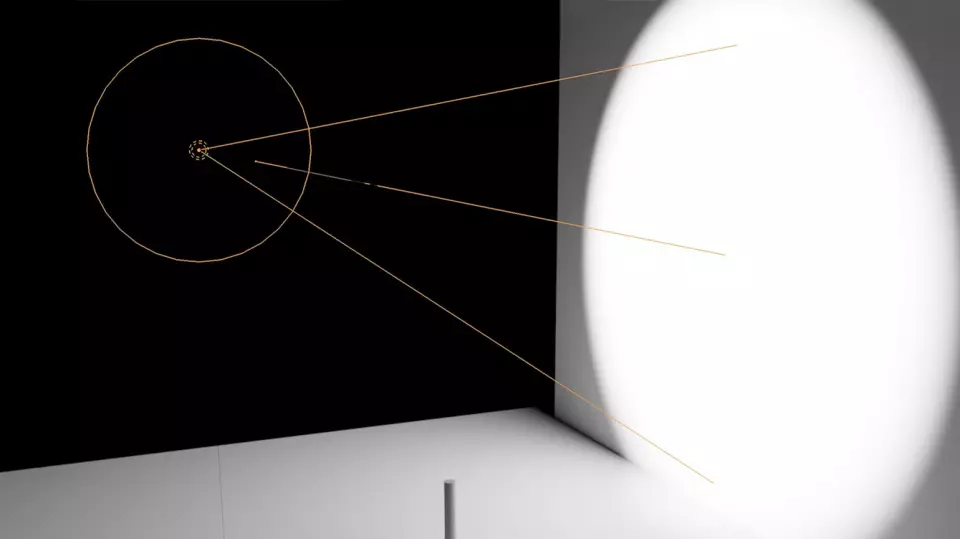
A small light source creates sharp shadows, while a large light source creates softer shadows due to its large emitting area.
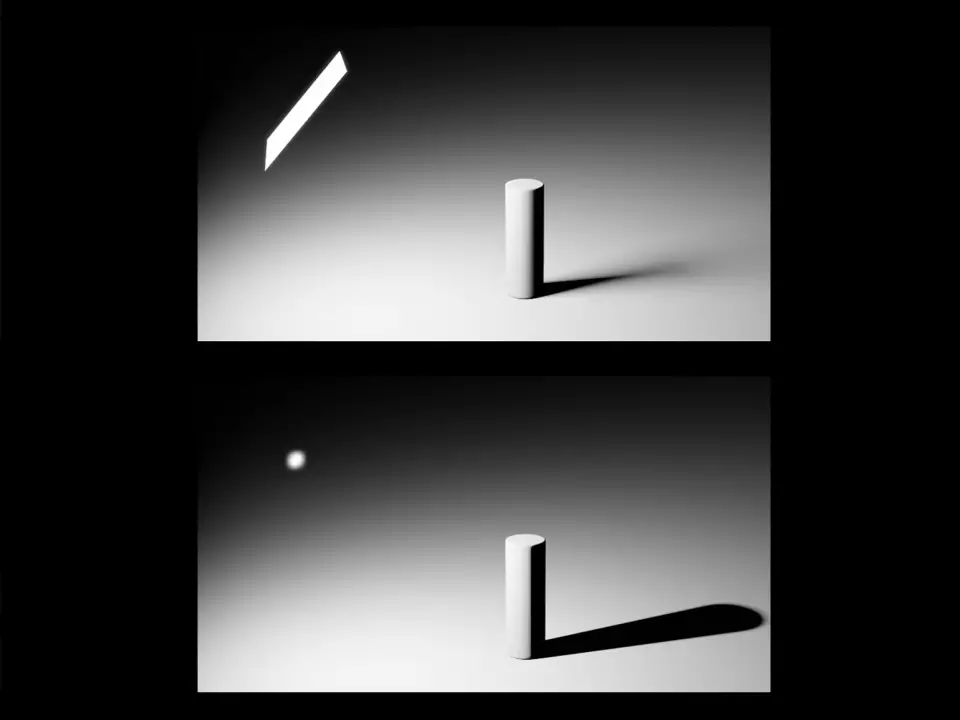
A large light source wraps around the object and creates a softening effect by filling its shadow side with light. The shadow remaining in the area where the light did not reach will be soft and will follow the outline of the object as the light source approaches.
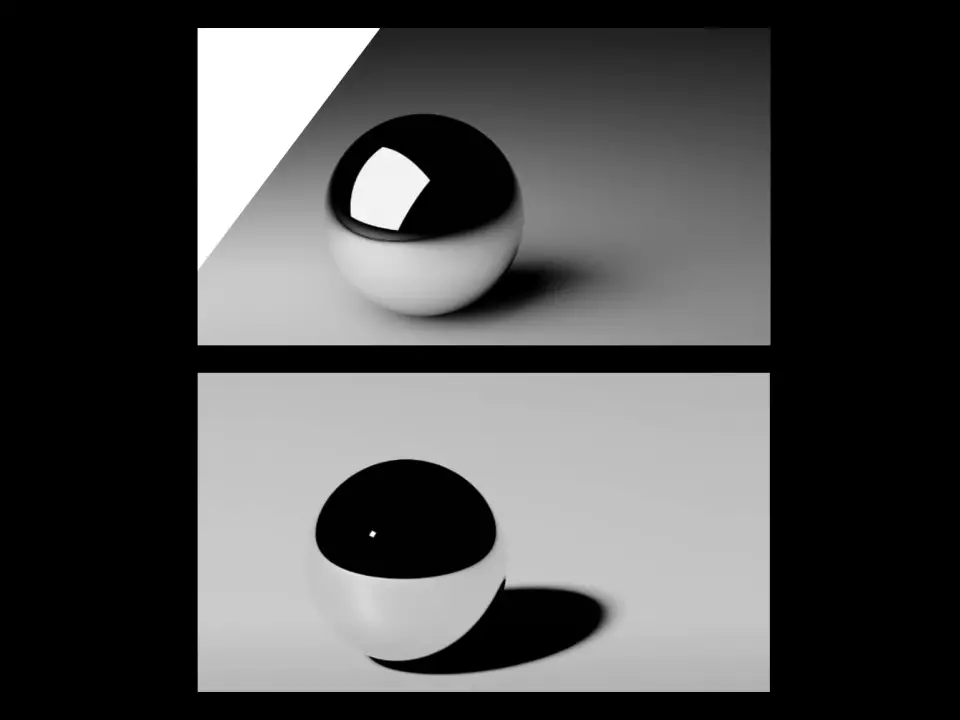
The outlines of shadows depend on the distance. If the light source is removed to a large distance, the shadow will become clear. This is observed, for example, in the case of the Sun, which, despite its large mass, is located at a significant distance from the Earth, creating clear contours of shadows.
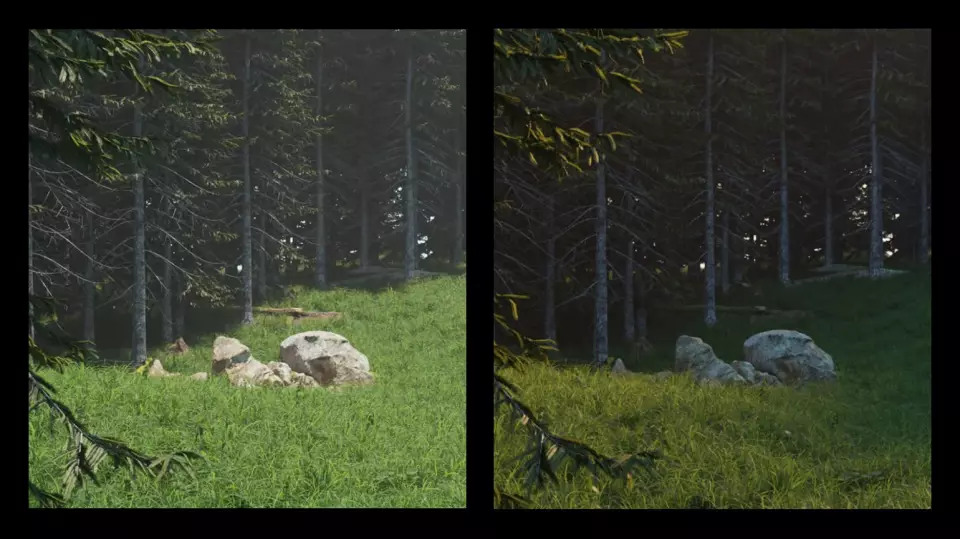
Thus, the size and distance of the light source affect the result. A large source creates a diffuse shadow, and a small one - a clearer one. When using a large source, the shape of the object is better visible, and a small source emphasizes the details. This is useful to keep in mind when creating visualizations.
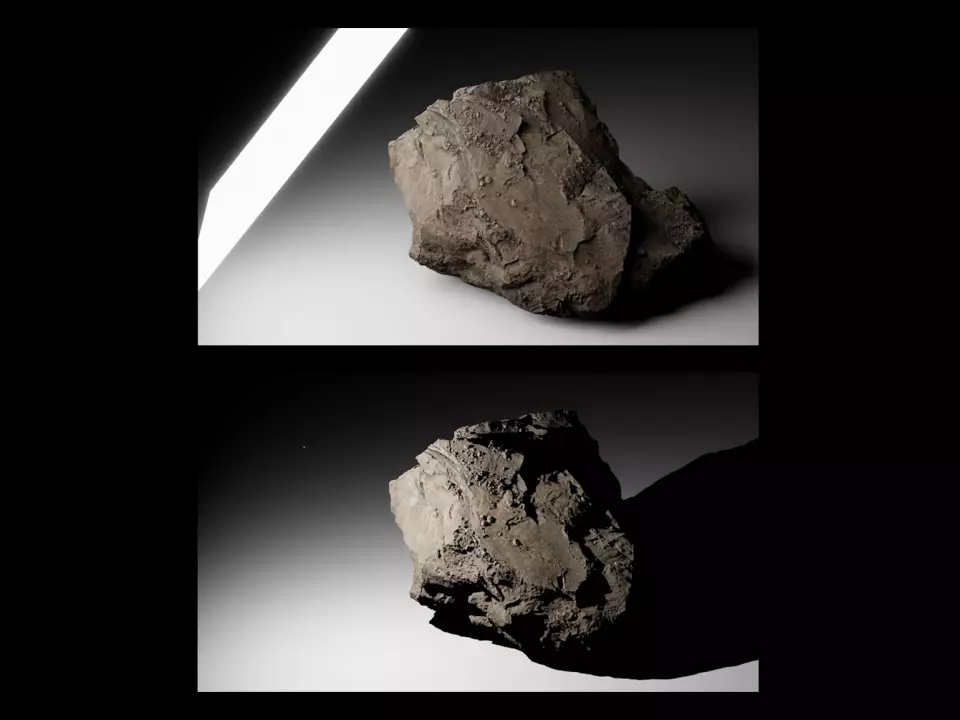
In front of the stone in the first render is a large light source that evenly illuminates the surface and smooths out the roughness. When the light source is reduced to a point (image on the right), new shadows appear on the object that highlight small details.
Because of this, when lighting people, it is preferable to use large light sources so as not to highlight all the skin imperfections, such as enlarged pores, acne, or wrinkles. However, large sources can create excessive contrast or overexposure, so photographers in the portrait Softboxes are often used in photo shoots - special attachments that diffuse light. A softbox helps to soften harsh shadows and contrast, hiding skin imperfections. A similar effect is achieved when shooting in natural conditions, such as overcast or cloudy weather.
In addition, when using large light sources, it should be taken into account that the skin texture becomes less noticeable, and this effect can be enhanced in post-processing of images.
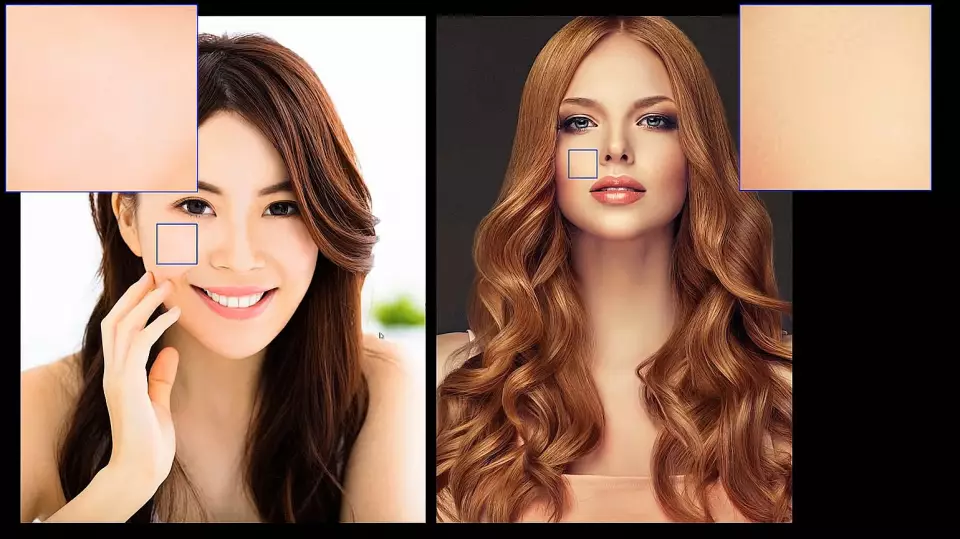
Above are two retouched photographs. On the left, a large light source removed some skin imperfections, but after retouching, the pores almost disappeared. Now the face looks so perfect that the viewer may think that he sees a doll, not a real person. For those who often work with retouching in Photoshop, Andrew recommends watching video tutorial from Phlearn.
Photography is an art that is characterized by a variety of shadows, including both hard and soft. This effect can also be achieved in 3D modeling software environments. As part of the experiment, Andrew created an analogue of a softbox in Blender, using a plane as a base. This allows you to get soft lighting with smooth transitions of shadows, similar to the effect achieved with a softbox in photography.
Create a Plane, go to the Shading section and build a chain of nodes:
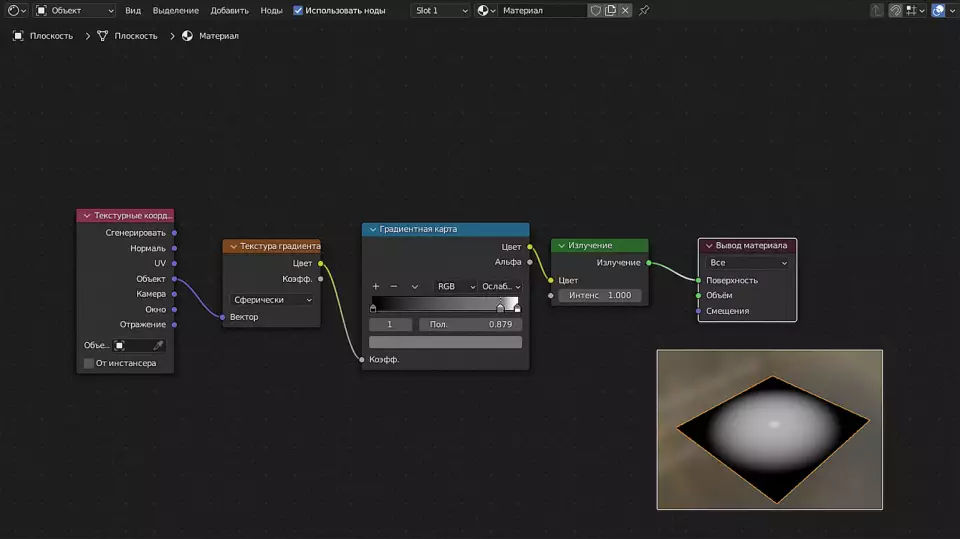
In Blender, you can customize the node scheme to create your own softbox. This process is demonstrated in Andrew Price's tutorial, available in English. The tutorial demonstrates the steps and results of creating a softbox in Blender.
Now let's use the light source on the model and see:
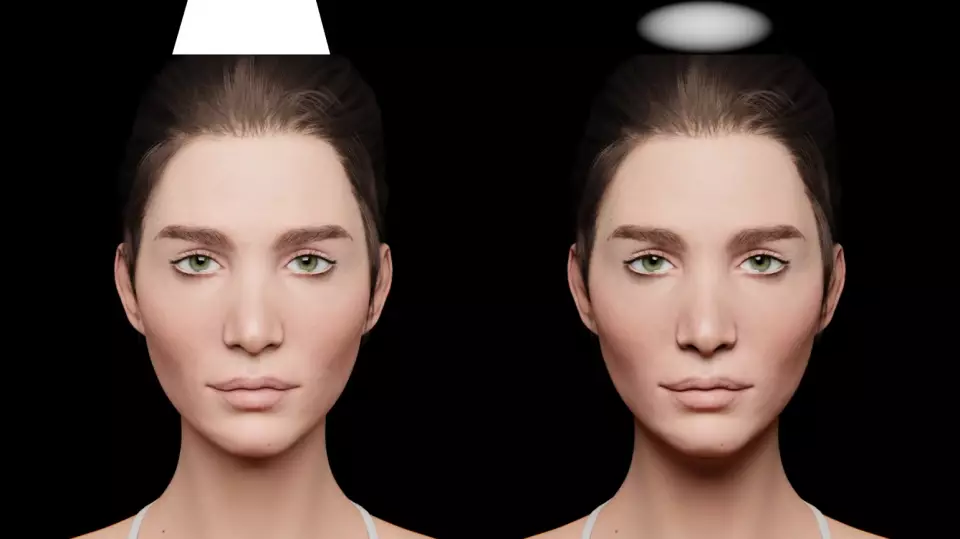
The left image used a regular light plane for lighting, while the right image used a plane with a gradient. The second image looks more attractive because the incident light does not completely cover the face. When setting up the plane according to the instructions, an area is formed in the center that is not affected by the gradient. This area creates a small point light source that gives the shadows sharper edges, while the smooth gradient softens them.
In the image, you can see that the skin texture becomes clearer, and the highlight in the pupil becomes rounder due to the shape of the new "lamp". This technique is great for lighting characters, as skin imperfections become less noticeable and the face acquires a youthful and fresh look.
However, it is important to remember that not all models require soft lighting. If the character’s appearance is not associated with beauty and the artist wants to emphasize texture, then hard light will cope with this task better.
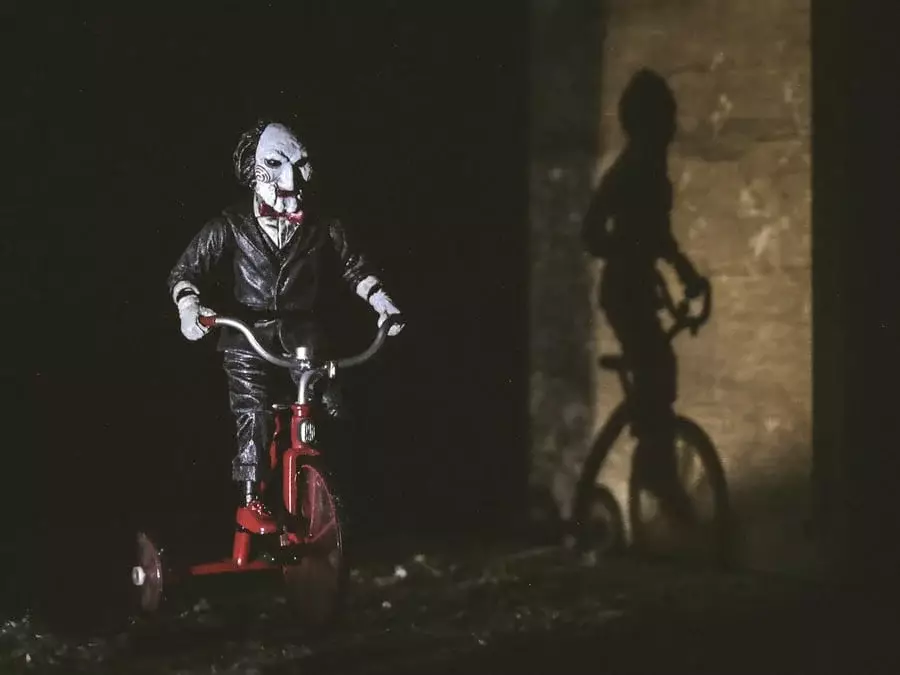
To create creatures with rough skin, scales, protruding veins and roughness, artists usually use a directional light source that imitates sunlight. This light source helps to highlight all the fine details and textures present on the surface of the creature.
Size of Light in the Environment
Earlier we discussed how midday daylight can create the impression of flatness in the environment. However, sunset is a special phenomenon where the sun is low on the horizon and creates diffuse lighting. At this point, the sunlight becomes softer and more diffuse, and the light source itself becomes part of the sky. This results in changes in the color palette of the lighting, and directional shadows appear. In photography, this phenomenon is known as the "golden hour", which occurs an hour after sunset and an hour before sunrise.
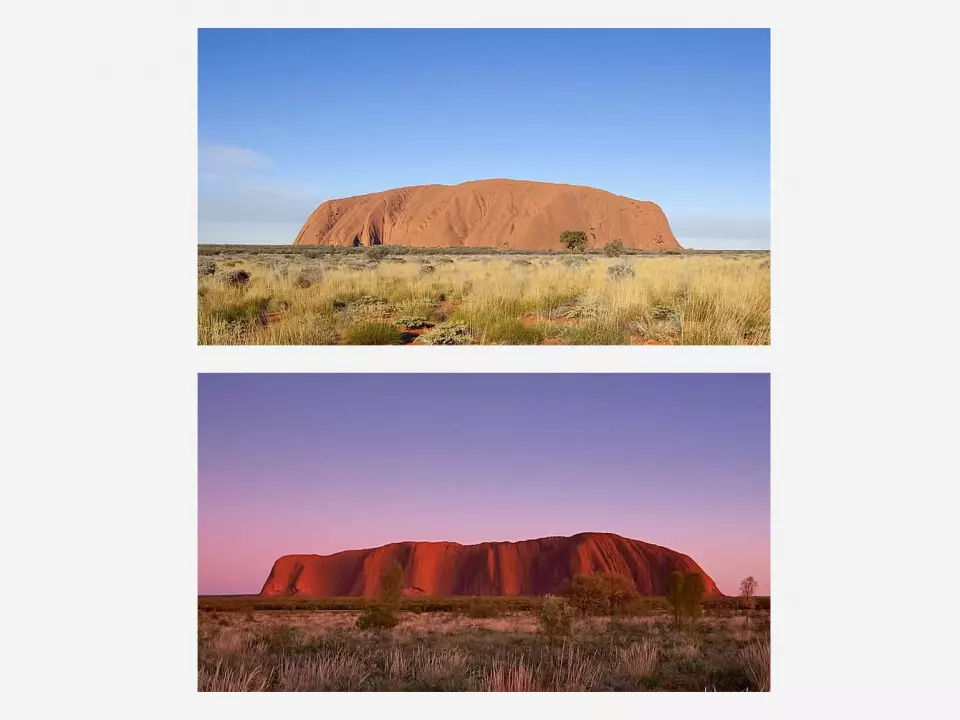
The landscape from above was captured at midday, from below — golden hour
The first image shows that in the midday light the mountain's surface appears flat and devoid of volume. However, in the second image, taken during golden hour, the subject is lit at a more oblique angle, which highlights its shape and gives it depth.
Landscape images taken during golden hour are often considered particularly attractive by publications such as National Geographic. Photo editors at major magazines in prefer works taken at this time, and rarely take into account photographs taken at other times of the day.
Such preferences were described in the book "Digital Photography. Volume 1" by Scott Kelby. However, as always, there are exceptions and cases when works taken at other times of the day can be considered and assessed positively.

The above work is from the The Rock Essentials collection for Blender Market. Here, a small, angled spotlight was used. It accentuated the fine details of the rocks with sharp shadows. It's unlikely that this landscape would look as impressive during the golden hour.
So, the choice of the size of the light source depends on the artist's goals. If the main goal is to convey beauty and youth, then it is better to use a large light source that can fill in minor imperfections and preserve the overall shape of the object.
However, if you need to emphasize details and create sharper contours, then a small light source will be more effective. Ultimately, the choice of light source size depends on what aspects of the object or scene the artist wants to emphasize or hide.
